
I may be just a tad dramatic calling this a “sourdough miracle”, but those of you with a beloved sourdough starter will totally get me on this. Plus, spoiler alert: something really sad resulted in figuring out the easiest sourdough method EVER. This is just what I need for my crazy-busy life, so I definitely call that a miracle, and you'll understand more when you hear the whole story!
Jump Links:
This is a LONG post because I wanted to include every detail for those who like that. BUT if you've already read this post and know the whole story, and/or if you're short on time and just want to jump to the different sections, you can use these links.
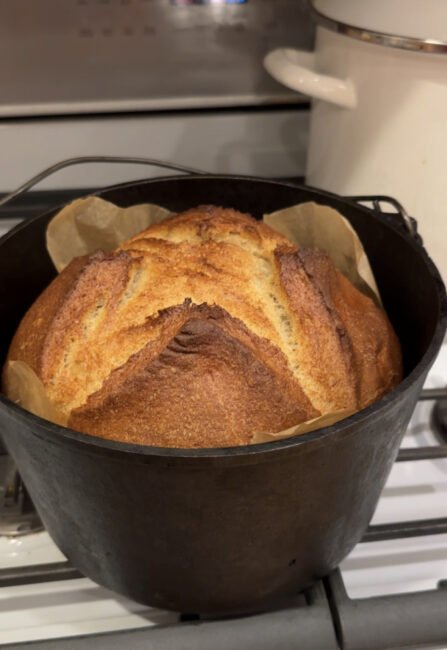
First, you may want to go see my newest post and video on how to make a beautiful sourdough boule (round loaf), it's easy and so crazy delicious!

Links in this post:
- WHY is sourdough better
- How THIS method is so much easier
- How I made my own sourdough starter from scratch
- What steps to take if someone gives you some of their mature starter
- My main recipe + how to adapt any bread recipe to a sourdough bread recipe
- Pizza Pinwheels
- Notes & Resource Links
- Just below, see my short video showing how easy it is to maintain your fermentation starters (dairy kefir & sourdough):
As you read, please PLEASE add your comments, corrections, or tips to the conversation!
***Here's a video showing how easy it is to maintain starters for dairy kefir AND sourdough and I talk about how easy it is to make real sourdough bread (video plays after the ad), ALSO after you watch the one below, go watch the newer more detailed video here with my sourdough boule or get the recipe here:
- UPDATE: the new way I store it in the fridge so it keeps longer without having to feed it weekly (if I'm not making bread for a while): I keep about an inch of starter in the bottom of a pint ball jar, then add an inch of einkorn flour on top of that. Then cover and put into the fridge. This keeps it fine for weeks! When you're ready to bake or want to feed it again, just dump the loose flour off the top into a bowl, scrape off and discard any funky looking hard bits off the top of the starter, then pour the good starter underneath in with the flour in the bowl, add a little water and stir, and then you have refreshed starter!
You'll see as you go through here that I'm really not a sourdough expert and I'm still learning a lot as I go.
So if I've made any mistakes or left out something important, I hope you'll let me know in the comments below! I won't be offended and hope you'll share your expertise to help all of us. As a matter of fact, when you get to the section where I explain the ways I'm planning to experiment next, I especially need you experienced sourdough bakers to jump in and answer some of my questions about baking with whole grains. Thank you!
A quick refresher on why figuring out my sourdough is so important to me…
I learned many years ago that sourdough bread is the most nutritious bread in the world, and here are some of the reasons why:
- The fermentation process (longer rise times with a starter and no yeast) unlocks more nutrition:
- The natural fermentation in soured bread makes it easier to digest and fully absorb the nutrients.
- Mixing flour in an acidic medium (your starter) at warm temperatures, as you do in the sourdough process, activates phytase and reduces or even eliminates phytic acid, which is a mineral blocker and can lead to poor dental health, bone loss and more. Another study showed almost complete elimination of phytic acid in whole wheat bread after eight hours of sourdough fermentation. (Source)
- Many who can't tolerate grains are able to eat sourdough bread with no problems because of the longer rise and more time for the gluten to be broken down, so it's easier to digest. (However, most agree that those with true Celiac disease should not indulge.) Read more about that here from my friend Sarah: Can Celiacs Eat True Sourdough?)
- Side note: the same is true about Einkorn flour. Einkorn is the original wheat that has never been hybridized, so many who can't tolerate regular wheat, even organic, can eat Einkorn with no problems, and this wheat is also higher in nutrients. (***Read more about Einkorn benefits here and also about hybridization vs. genetic modification/GMOs. And after the recipe at THIS newer post, read more about why so many now can't tolerate bread in the U.S., but can eat it in Italy with no issues!)
- Sourdough lowers the glycemic index of the bread, meaning it doesn't cause the same blood sugar spikes as other breads will.
- A gal I found on Instagram, Amber, who I'll link to below, said something I hadn't heard before but it wouldn't surprise me, knowing the power of fermented foods. She said that if you were to try and live on only flour and water you could not survive, but if the flour and water was fermented as in a sourdough bread, you COULD live indefinitely on that and be healthy. Crazy, right?
- A big bonus is that you're not dependent on yeast, in case it's out of stock everywhere again like it was at the height of the Covid craziness.
- Sourdough is the most traditional food, it’s the way bread was made for thousands of years!
Bread of Life
I love thinking about how Jesus is the Bread of Life, and how people have been eating bread for possibly 100,000 years! So even as I continue to attempt to eat less carbs to keep a handle on my weight and blood sugar, I remain convinced that ideally we can keep bread in our diets if it's prepared correctly, and sourdough is the best option!
So those are the reasons why I took on this challenge, and eventually I figured out the easiest sourdough method that works!
First a sad story, some terrible news, and then the sourdough miracle…
A sad story
It all started when I was out of town recently (a conference in Virginia at Joel Salatin's farm! Here are some pics if you're on Instagram or Facebook) and after getting home I knew my starter would need a feeding. I also needed buns for dinner the next day. I started looking for it and then freaked out wondering if it got tossed. If I leave it too long it does start to look bad on top, all brown and hard, but underneath is the GOLD…
So I asked Kent and sure enough, it did get thrown out. Being the great guy that he is, he was cleaning out the fridge while I was gone, and me, being the ditz that I am, didn't have my beloved starter labeled.
I was heartbroken and tried not to cry!
I'd been working on that for over a year, since not long after the whole Covid crazy began, which somehow, don't ask me how, led to the yeast shortage. I had tried making my own starter but wasn't having any luck getting the bread to rise, so this one was from my friend Lindsay who gave me her specific instructions that she said work every time. Her instructions are basically exactly the way Carla explains in her Einkorn Cookbook, only with extra feeding steps.

It took me a few feedings and lots of trial and error, but I had finally gotten Lindsay's starter to work myself. This means that instead of bricks, which I used to make a lot of breadcrumbs and croutons, I eventually got it to RISE enough to make delicious bread, homemade rolls, bagels, etc. Every time I pulled it off I'd do a happy dance, and was just so thrilled!
But then it was gone. Kent felt so bad. He gave me a hug and said, “I'm so sorry, I know you worked really hard on that.” I admitted that I definitely should've had it labeled!
Terrible News
Ironically, later that same day I found out via Instagram that Carla, Jovial Foods founder and author of the Einkorn Cookbook I was telling you about, “died unexpectedly after a brief illness“!! (FYI: Her family said later that it was not Covid or vaccine related.) I was so shocked and sad for her family! I only met her in person once, it was at a Weston Price Foundation conference:

We also chatted via email now and then over the years. Most recently was a few months ago when I was getting frustrated with my sourdough flops–this was when I first got Lindsay's starter and still wasn't having any luck, so I reached out to Carla. Even with a busy, successful business and two kids, she was so sweet to get back to me. I asked how to make my starter stronger, because mine smelled great and was very bubbly, but just wasn't getting enough rise. Here's what she said:
“Hi Kelly, nice to hear from you! Every starter, even those not made with einkorn, take a while to get going. Not sure when you started yours, but if it is bubbly, that is already a good sign. Here is what I recommend:
-Refresh everyday for three days, but do not put the starter in the fridge.
-Make sure you weigh all ingredients in your recipe with a scale and don’t add extra flour, even if the dough seems sticky.
-Let your bread rise longer after you shape it. When the starter isn’t strong, the second rise can take up to three hours. Don’t bake unless the shaped loaf feels pillowy.
-Always bake in a very hot oven.
Don’t give up, I had the same problem when I started, my bread was like a brick. Keep baking and magically, it will start working soon.
You can also add a pinch of active dry yeast to your dough, but I never did.
Lauren in our office coaches a lot of people, you can always call her. We can also send you a piece of our starter if you want. Up to you.
Let me know how things go.”
So between her advice and Lindsay's, I did finally get good rises and wonderful sourdough bread! And then it got tossed and I thought I'd have to start all over, BUT…
The Sourdough Miracle!
So I reached out to Lindsay to see if I could get more of her starter, but I think she was out of town for the weekend and I really needed buns for the next day. That's when it hit me… I wonder what would happen if I just gave my backup starter some extra feedings before baking days, the way I did with Lindsay's starter?
Here's the back-story on my backup sourdough starter…
Before getting Lindsay's starter and playing with her recipe combined with Carla's, I was messing around with making my own starter. I faithfully fed it weekly even if I wasn't baking with it, followed all the right steps, and tried so many recipes–and again, it got bubbly, but my breads would never rise enough, so the finished product was just so dense. Then after I got Lindsay's starter and was having success with that, for some reason I still kept feeding this backup starter weekly–I don't really know why I kept that one around when it wasn't working well, maybe just nostalgia since I started it myself.
The miracle!
So giving my backup starter extra feedings before bake-day, the way Lindsay had taught me to do with her starter, actually WORKED! But the very best part, and the reason I ended up telling Kent THANK YOU is because it turned out to be a blessing that he tossed my starter, and this is why: on a whim I tried making my homemade buns the easy way with this starter, by adapting the recipe for my Mom's rolls to a sourdough recipe with no yeast, and THAT WORKED TOO!
Here's how it is so much easier with what I'm now calling… The Easiest Sourdough Method EVER:
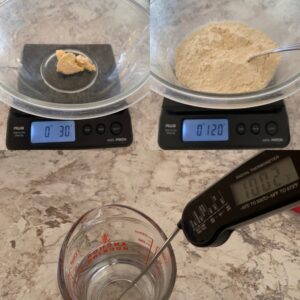
1. Lindsay/Carla's method requires a kitchen scale to weigh the water and flour and get the amounts just right, and a thermometer to get the temp of the water just right for all of your feedings, whether it's a feeding before you're baking or if you're just refreshing your starter. Now this isn't a huge deal and it did get faster the more I did it, but my method for feeding my backup starter was even easier: I just eyeballed it and my recipes were still turning out! I'd add approximately the same amount of flour to the jar as the amount of starter that was already in there, sometimes less if I had a lot of starter, then add enough filtered water (right out of our faucet) to get it to the right consistency–like a thick pancake batter.
2. Lindsay/Carla's method requires mixing, letting it set, finish mixing, letting it rise once, doing the final shape, then the final rise. For my easier method, I just mix, shape, and let it rise, that's it! Note that Lindsay/Carla's method and my method both do require you to think ahead before you'll need bread or buns or whatever you're making for dinner the next day, so you have time to get the extra feedings in. This is the most important step, this strengthening of your starter is what makes it possible to not use yeast, and to not need 2-3 rises instead of just one, and still get a great rise. Yes it still takes that one longer rise vs. when you're using yeast, but that's the whole point–you want to have time for the magic of the fermentation process to happen to get all the health benefits, but it's still less steps!
So that's how something sad (when Kent tossed my starter), turned into something so exciting and wonderful: when I realized my backup starter worked great too, and with less steps. Here I've tried for months, years even, since at least 2010, to get my sourdough to work, and it turned out to be so much easier than I realized!
A note to professional bread bakers:
Now some of you wonderful professional bread bakers out there may tell me that you'd get a better result without skipping those steps, and Carla talks about some of that in her book, but here's the thing: even though our kids are getting older, we've still got a lot going on here everyday! I love every minute of it, between my business, homeschooling, running Kasey to all his activities, etc. (our other kids are older now), and cooking our meals from scratch–which is a priority for me. It's all good but busy. So if I can make this extra nutritious bread with less steps, I'm going for it, even if it's not perfect. Especially if it has a nice rise, a good texture, great taste, and the family loves it. 🙂
Details:
Now that you know the whole story, I'll explain more of the details for those who want to give it a try. So many of you have asked me to get this post up, and I hope you'll let me know if you think this is the easiest sourdough method too! Here we go…
How I made my own sourdough starter from scratch–making and caring for your own sourdough starter:
This was a little over a year ago, probably late March of 2020 after Covid Crazy geared up. I got the method from @AmbersKitchen on Instagram. She shows exactly how to do this in her story highlights if you want to watch that, but I'll explain below too. She starts with small amounts so she's not wasting as much flour, since in the beginning stages you have to toss half of it every day (this is called “discard”) before adding more flour and water.
- You'll need any unbleached flour, preferably organic, and even better is Einkorn all-purpose flour–that's all I use in my starter because of the benefits mentioned earlier: it's the original wheat that has never been hybridized, and many who can't tolerate regular wheat can eat Einkorn with no problems. I add in regular all-purpose organic flour when I'm making the bread (einkorn doesn't rise as easily as regular AP/all-purpose flour, so I'm always working on it and trying different things), but only Einkorn in my starter. You don't have to do that too, that's just what I do so as I continue to play with it, so it'll remain what I think of as a “pure” starter.
- In a small bowl, start with 2 heaping Tablespoons of flour + 2 Tablespoons filtered water, the amounts don't have to be exact. Go by texture, you want it to be like a thick pancake batter. If you don't have filtered water with no chlorine, just let your water set for an hour and the chlorine will evaporate.
- Stir well. Amber or someone said to use a non-metal spoon to stir it, so I always used my wooden spoon. BUT Carla always used a regular metal spoon, so I've started to do that too with no problems. (Maybe it's fine once the starter is mature?)
- Cover with a plate over the bowl (or a loose lid on a ball jar) and let set at room temp for 24 hours or so.
- The next day scoop out and discard half of your starter. Add another heaping Tablespoon of flour and 1 Tablespoon or so of water, again, mix 'til it's the consistency of thick pancake batter, cover loosely and again, let set for 24 hours.
- Keep doing this daily, bubbles and smelly liquid is normal on days 5-10, even mold is okay. Just scoop that part off before you add more flour and water for the next feeding.
- After about 10 days you can use your discard in recipes, but she explains why it's not usable early-on: because just until your starter is mature, or when you're reviving a dehydrated or old starter, it could harbor bacteria, and it won't smell great either. Always trust your nose.
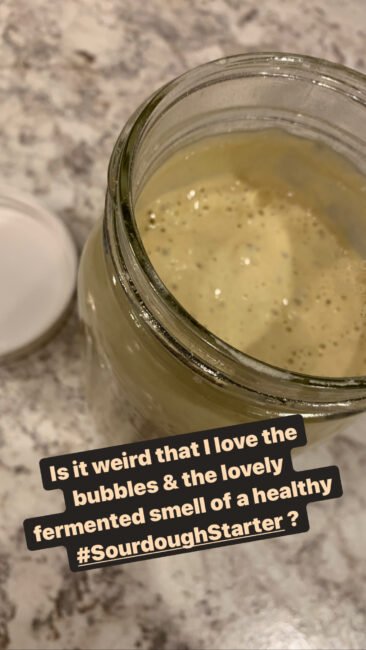
- About half-way through the process I transfered it from a bowl to a 1-cup ball jar with a rubber band around the side at the line where the starter is, so as it bubbles overnight you'll be able to see how much it went up the sides. This is so fun when you see it starting to work! It should be bubbly and smell wonderful, so fresh and sweet and alive.
- I always set a lid on top but don't screw it on. Sometimes I'll rubberband a thin towel on top. You want the wild yeast from the air to get in there, but keep the dust or bugs out.
- It’s ready when it smells sour but fresh and has lots of bubbles, and when after feedings it doubles in size, which will be after day 10 or so. She also explains that a small spoonful of starter should float in a cup of water if it's ready to use, but I've had it float before and still not gotten a good rise! So I'd suggest “beefing it up” with 2-3 daily feedings (without discarding any at that point) for a day or two before baking with it.
- I'll usually add however much flour to match what's in there currently, or less than that if I'm starting to get a lot of starter–remember you need room for it to bubble up to about double. Obviously not using exact amounts doesn't hurt anything. (Although I've heard that adding too little flour is better than too much, because supposedly you can overwhelm it? No more than 3 times the amount of flour as the volume of the starter is what I've read. Obviously I'm no expert at this!) Then start adding water a little at a time to get a thick pancake batter consistency. You'll need to transfer to a bigger quart-size ball jar or even a half-gallon jar depending on how much you end up with and how bubbly it's getting.
- (Start at this step if someone gives you some of their mature starter to begin with…) Once you have a mature starter, you can just refresh once a week if you're not baking with it: just add more flour and water as explained above, leave out overnight to ferment with a loose cover (you should see that some bubbly action was happening overnight), then back to the fridge. I keep a note in my calendar to feed it every Sunday and I'll think then about what meals we're eating that week and if I want to bake with it.
- Feeding weekly is best but I'm pretty sure that if you forget about it for a few weeks, you'd just scrape the top off that would probably be crusty or icky, then refresh with the starter underneath in a new jar. By ‘refresh' I mean: add flour and water again, stir, cover lightly, let set overnight, then do more feedings to get it ready to bake with, or put it back in the fridge. (***See my note above for an even easier way to store your starter when you won't be using it for a while!)
- If I'm baking on a Tuesday for example, I'll pull some out to a bowl (reserve some in the starter jar–I'll usually feed that again too and let it set overnight before putting back into the fridge), give it a feeding Monday morning and Monday evening, maybe one more in between there too, even with just 1/4 cup of flour or so (and again, enough water to make a thick pancake batter). Then I'd make the bread dough recipe Tuesday morning so it can rise much of the day. Although now that my starter seems pretty strong, I can get it out the night before and just feed it once then, and maybe once early in the morning before making bread later in the morning and that gets me great results.
- If you don't get a good rise, just make some croutons or grind it up in your food processor for breadcrumbs in recipes, keep feeding it, remember the extra feedings before bake day (that's key), and be patient!
- In the beginning when it still wasn't strong enough and I'd have a couple of cups or more of excess starter, I'd use it to make “discard recipes” with yeast, so I wasn't wasting flour–especially since for a while there during the lockdown craziness you couldn't find any flour, let alone Einkorn flour! So I'd use the same replacement ratios as I mention below (for every 1 cup of stirred-down starter that you add, omit 1 cup of flour and 1/2 cup of liquid from the recipe). Here are some “discard recipes” with yeast to try as you're strengthening your starter, like pancakes or pizza dough. BUT once it's strengthened, if you're baking 1-2 times/week or so, you can just build up your starter more, and then use it all for your baking. I don't really have any extra discard anyore, I can usually just feed it enough for what I need. If ever you do have extra you could also share with a friend!
- Whenever you're using your starter to bake, remember to ALWAYS RESERVE SOME so you don't use it all up and accidentally lose your beloved starter–keep it in a labeled jar in the fridge!!
- Reader question: Do you buy whole grain or all purpose flour? Answer (just to clarify the above info): I use both. I use all purpose for feeding my starter & keeping it going. I use whole grain for feeding and bulking up my starter before mixing. And I use organic unbleached bread flour for the last half of the flour when mixing. But you can do any combo you like, it’s just that all whole grain or even all einkorn all-purpose can sometimes make heavier loaves that don’t rise as well. (In my experience anyway, others say it works great for them.)
Adapting any bread recipe to a sourdough bread recipe is easy! (Plus here's the recipe I use the most)
There are tons and tons of sourdough recipes online, but I'm going to show you the simple way that I do it: in any bread recipe such as homemade rolls, regular bread, cinnamon rolls, etc., just use 1 cup of your well-fed and stirred-down starter to replace the yeast, and omit about 1 cup of flour from your recipe and 1/2 cup of the liquid that's called for.
This part is important: be ready to adjust as needed.
If your dough is looking or feeling dry, add a bit more liquid. If it's looking or feeling too wet and you can tell that it won't hold a shape when you form it, add a bit more flour. Dough that is a little sticky is much better than a little dry, just use floured or buttered hands to shape it, and this will also make a lighter bread. You'll get a better feel for this as you get more experience–a perfect dough feels so good, you just know it's going to taste amazing!
So to adapt my Mom's homemade rolls recipe into a sourdough recipe, here's how that looked (these are the notes I took in my phone as I was baking that day):
- Pull some starter from your jar into a bowl, I usually leave 3-4 Tablespoons or so in there and then give that a little feeding (flour and water), let it set out overnight lightly covered, and back to the fridge the next day. With the starter I pulled out into a bowl, that's what I'll give some extra feedings to before baking the next day. Give extra feeds starting the morning before–2-3 times that day. Or as I said above, now that my starter is stronger, I just feed it once before bed, once the next morning, then mix the dough late morning so it can rise and be ready for that day's dinner. (Most recipes call for 1 cup of starter for 2 loaves of bread, but I always make a lot of food for my crew, and I was shooting for feeding it enough to make OVER 2 cups of starter, so I had some left to keep it going after taking the 2 cups out.)
- The next morning, I made the recipe with no yeast–it's so fun! I used 2 cups of stirred-down starter, so I took out from the recipe: 2 cups of flour and 1 cup of water, here's how that looks in the recipe:
- Throw the following into the Bosch (or you could just stir with this awesome dough whisk and then knead by hand like my Mom used to):
- 2 cups stirred down sourdough starter for two loaves (again, don't forget to reserve some!)
- 1 cup warm filtered water, not hot (original recipe calls for 2 cups)
- 1/4 cup this sugar (original recipe calls for 1/2 cup sugar, but I cut that back more)
- 1 egg
- 1 1/2 Tablespoon soft butter
- 1 1/2 teaspoon sea salt
- Mix, then add in 4-5 cups flour (I used 4 cup regular organic all-purpose flour & 1 cup Einkorn AP flour, original recipe calls for 7 cups of flour), start with less and add more as needed. It'll clean off the sides of your blender bowl (or almost) when it's good.
- It was too wet so I added in another 1 cup regular AP flour, you may or may not need this, see more just above: “be ready to adjust”
- Took 5 hours to rise by the window in the sun, SUCCESS!!! It tasted great! (More info here at the original post about shaping, how long to bake, temp, etc.)
- Makes 2 loaves of bread or about 3 dozen golf ball size dinner rolls (which rise to about double that size).
Note that a longer rise in the winter months would be normal, I always allow for more time and then you can bake earlier if needed. It's not AS good as bread that's fresh and warm from the oven, but you could always pop it back into the oven for a bit to warm it.
***Want a gluten-free sourdough starter? Try this one from my friend Wardeh!
Keep your own good notes so you know what works for you, your starter, and your kitchen!
As noted in the original recipe, I use this dough to make everything! Dinner rolls yes, but also hamburger or hot dog buns, sub buns for easy sub sandwiches or meatball subs, and cinnamon rolls are great too.
A quick note about breadmaking machines:
Because you can easily adapt any bread recipe to a sourdough recipe as explained above, if you want to use your breadmaker machine, just follow the instructions that came with yours (they usually include recipes or you can find many online) and bake away!
Please do let me know if you try this and if you also think it's the easiest sourdough method ever!
By the way, this is a work in progress…
So I reserve the right to tweak this post over time as I learn more and practice more. 🙂
Next I want to try experimenting with a few more things (see all of my updates here too!):
- I'm going to make a new starter from scratch again–just so I have another backup AND I want to see how long before I get a good rise from it now that I know that more feedings is the important key. UPDATE: I started from scratch on July 5 (instructions are above) and it was really smelly at first. Even after a week or so, there were more bubbles forming and it was definitely active, but it wasn't until day 17 that I was ready/comfortable to use it for baking. It finally had “the” smell that I love, the fresh sweet bubbly fermented scent. Next I'll try building it up (giving extra feedings a day or two before bake-day) and baking with it and then report back. 🙂 UPDATE: This starter works just as well as “Carla”/my original starter, and it really only took about 3 weeks to get it to that point, extra feedings before bake day really is key! I show more about this in the newest video.
- I also want to play around with more feedings in the days prior to baking and see if I can build it up and use ALL starter with no extra flour in the recipe the morning that I bake. That way all of the flour will have fermented for a longer time: during the overnight ferment AND during the rise. This should take less time to rise too. This dough may be too wet though or maybe too sour for my family's preference, I'll see… UPDATE: Don't do this, it comes out way too sour and nobody liked it!
- I want to use more Einkorn AP flour in the actual recipe and see if I'll still get a good rise vs. using part “regular” organic AP flour that I do now. (The organic AP flour I use is from Azure and I do trust it to be good, it just doesn't have all the benefits of Einkorn.) UPDATE: I tried using ALL Einkorn flour because our daughter has been sensitive to gluten lately, and often with traditional grains (and European grains) people who are sensitive can eat these grains with no problems! First, I added in a little extra sugar, thinking it would make the starter happier and maybe help it rise more. Also, it was definitely stickier, so I needed more butter on my hands when shaping. I let it rise 6 hours and it got very little height. So I put it in my warming drawer for 45 minutes or so (on a towel, on the lowest warming setting) and that definitely helped it get higher. BUT it still didn't have as much of a rise that you need for a light wonderful loaf. This still tasted good though, and is tasty right out of the oven and for toast, but to use the next day for sandwiches or whatever, not so much. So I need to pull out my Einkorn book, do a little more research, and figure this out. For now I'll stick to using einkorn for 1/3 of the flour called for or maybe 1/2…
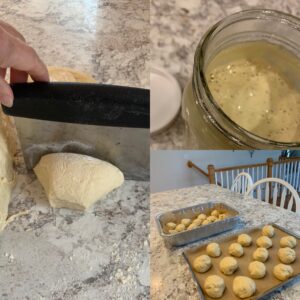
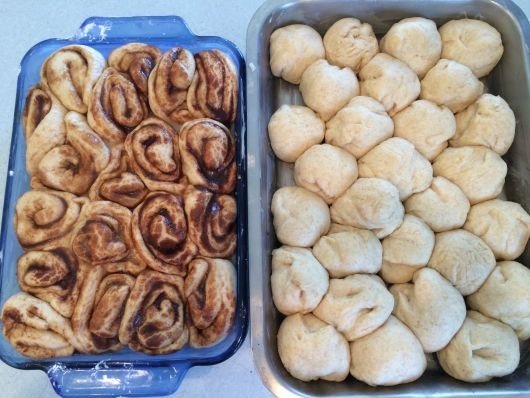
- I'm going to use my grain mill to grind fresh whole grain einkorn into flour, I'll add more and slowly build up to see if I still get a rise. The whole point of sourdough being healthier is because of the slow rise and fermentation which makes the whole grains healthier and more digestible, and while I'm sure it's still better for us and more digestible with the AP/unbleached white flour, it's definitely doesn't have as many nutrients as whole-grain flour. BUT the problem is that the more whole grain flour you use, the heavier and more brick-like your bread becomes–it also is more sour due to the longer rise, which makes my family not like it as much! (See more below on that when I asked my friend Maureen for help.) I'm guessing the most I'll get it to is HALF whole grains to still have it be palatable for my family. UPDATE: I first tried this when I was making “pizza pinwheels” for dinner. (Photo below.) After grinding 1# of einkorn wheat berries (which made 5 cups of flour, FYI) I then used some of that in my feed the night before and a little more in my dough the next day. I'll share more specifics after I play with it more. I don't know how well it did as far as rising, because with pinwheels you don't really need as much of a rise as you would with bread, but they tasted really good and no one noticed the difference! ANOTHER UPDATE: I tried a loaf with 100% whole spelt and it WORKED! It actually rose up well and tasted good too. See more updates about this in my newest video. I think we all still prefer half whole grain, half unbleached white.
- Pinwheels: In case you're wondering, to make these just make a batch of dough like normal (see recipe above) and split it in half. I roll out half the dough at a time on the counter with a little flour, spread on it whatever toppings you want (I did turkey and shredded swiss on one and on the other: pizza sauce, ham, cheddar), roll up, slice, place on a parchment lined pan, and bake 'til golden. So good!

These are some notes I'm keeping here just so I can remember what I found out…
There are some options that I've heard will give you a lighter whole-grain loaf, but I'm wondering if these are safe/healthy:
- Many bakers, and especially store-bought whole grain breads, add Vital Wheat Gluten to make a lighter whole grain bread–is this healthy if the only ingredient is gluten flour like this one? UPDATE: I checked with Maureen Diaz who does all the bread-baking for the WAPF conferences, and she said, “Adding more gluten is both unnecessary and can be overwhelming to those who, knowingly or not, may be gluten sensitive.”
Here's what else I found: “This additive completely negates any health benefits of sprouting (or the long rise with sourdough) and actually contributes to the development of digestive issues over the longterm.” Maureen said, “That’s exactly what I knew intuitively!“ - Dough enhancers are also used for best rise and lightness and consistency, and this one has ingredients that aren't too bad–would it be worth it to use that in order to make a bread my family would eat with more nutrients from the whole grains? (I also found this info on using your own dough enhancers and may try those first!) UPDATE: I asked Maureen about this too and she suggested instead to try using only 50/50 whole grain & unbleached flour, being patient with a longer rise and punching down now and then (which is always hard for me because I don't want to lose that rise, but I'll have to try it!), and using milk instead of water in the recipe. (Most recipes call for scalded milk.) “Then you probably won’t find a need for a dough enhancer.” But if I don't have good luck using more whole grains with those tips and don't get enough of a rise or it's too heavy and my family won't eat it, I still may try it and report back.)
- I've also heard that sifting it to get the heavier whole grain pieces out will help get a lighter rise and a lighter taste, has anyone tried this?
I decided to give my starter a name
As I said above, it's ironic that I found out Carla passed on the same day that I was figuring all of this out, so I decided to name my starter Carla. 🙂 I'm so grateful for her research on this original grain of wheat, for her cookbook full of beautiful recipes, and for her help over the years. May God bless her sweet soul and I also pray for her family as they grieve. She and her husband have two girls, and I know from experience that saying goodbye to your Mom is tough.

More important notes, tips, & resource links:
- These pre-cut parchment paper sheets have changed my life, not kidding! I use them several times a week on baking sheets instead of buttering them or spraying with the avocado oil cooking spray. That spray is awesome now that there is such a thing again after years of not having an option without weird ingredients, and I use it for some things, but the pre-cut sheets are even easier! I also use them when I'm taking meals to others and using those aluminum disposable pans, this way the food isn't by the aluminum. (Be sure not to get coated parchment!)
- I got the USA pans that Carla recommends for best rise: “It is a natural non-stick and non-toxic silicone that is PTFE, PFOA and BPA- free.” Those are for making traditional shaped bread loaves.
- I'm so excited now to try these sourdough recipes that never worked great for me before because I couldn't get my starter right and/or didn't have the extra feedings step figured out! That older post also has a lot of good info and tips plus links to helpful supplies that you may want. Here are the recipes you'll find there:
- Sourdough waffles
- Sourdough pizza crust
- Sourdough pancakes
- Sourdough crackers
- Sourdough English muffins
- Again, there are so many good recipes in this cookbook!
- Did you know that I wrote a book to help those trying to eat healthier? Real Food for Rookies
- Here's more of the science behind sourdough bread.
- Here's some info about sourdough rise times.
- I'm excited to try this Sourdough English Muffin recipe soon!
What did I forget?
This post took forever to gather all of the info and get it organized and written, so if I forgot anything or you see any mistakes, please let me know so I can fix it. Again, I won't be offended in the least, I'd actually be grateful!
More you might like:


Micaela Brundage says
Oh my! Yes! I would never have taken on sourdough if I had to weigh the ingredients, NO WAY! I am not an expert on sourdough by no means, but starter is one of my favorite ferments because it’s so low maintenance. I usually feed it once a week like you do, and sometimes I forget to get it out soon enough, I have found that I can still get a decent loaf of bread out of freshly fed starter even if it hasn’t had enough time to get bubbly. I use an egg as a dough enhancer, easy and simple to have on hand, my loaf of bread consistently turns out lighter with an egg added. Thanks for your description of turning a regular recipe into sourdough, I never could get that figured out before!
KitchenKop says
I never knew (or I forgot) that egg is a dough enhancer!!!
Thanks Micaela!
Kel
Melissa says
I would really be interested in conducting an experiment with Einkorn vs. regular flour on my daughter’s blood sugar!! I never knew that einkorn had lower glycemic impact. Since we have real-time data of her blood sugars, that would be amazing data to have.
KitchenKop says
I’d love to hear what you find out!!!
Kel
Sarah says
I loved sourdough bread! I am grateful I can still make it for my family. Once in a great while I can indulge and have a little bit. I have a definite gluten sensitivity. When I quit eating it (most of what was consumed was homemade sourdough) the amount of hair in my hairbrush decreased by 60%. I am eager to try a new cinnamon roll dough for my family. It is always good to change things up a bit. Thank you Kelly!
KitchenKop says
Interesting about your hair!!
Have you ever tried homeopathics for your gluten sensitivity?
Kel
Sarah says
No, I have not tried homeopathics for that. Right now I am a bit paranoid to change things up since they are going fairly well.