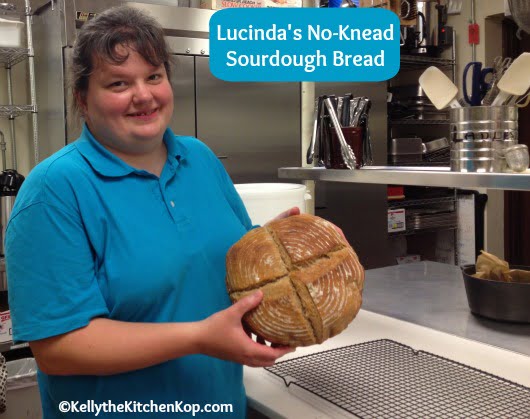
Ready for the best sourdough bread recipe?
Since sourdough bread is the healthiest bread there is, hopefully you'll all have loads of success with this tried-and-true sourdough bread recipe. Last week Lucinda gave a demonstration for our local WAPF chapter, and since she has experimented with sourdough bread extensively and has now perfected her recipe, we were all excited to have someone knowledgeable and experienced to learn from. I got to taste and see how light the inside turns out, and it has a nice crust that's chewy yet somehow also crispy.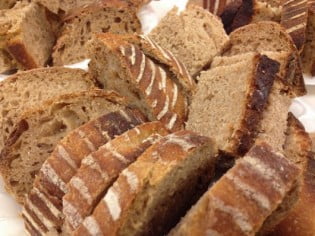
This sourdough recipe makes an artisan-type, round loaf, but she's working on a sandwich bread in a loaf pan, and on her cinnamon roll recipe, too.
And get this, she's also perfected all sorts of other sourdough recipes for Sourdough Galore – English Muffins, Crackers, Pizza Crust, Pancakes, and Waffles. (She brought her sourdough crackers to the meeting so we could try them – they're really good!)
Lucinda has even agreed to answer your questions here in the comments as she's able, what a sweetheart. 🙂
First, why is a true sourdough bread the the very healthiest for us?
- Sourdough is a low-glycemic bread, so it's better for those with blood sugar issues! However, be sure to proceed carefully with this, try a little and see how you do. (Source)

- According to Rami Nagel, author of Cure Tooth Decay, sourdough is the healthiest bread there is. More information:
- Phosphorus in the diet (at least from grains) needs some type of calcium to bind to. This explains the synergistic combination of sourdough bread with cheese. Historically, the cultivation of grains usually accompanies the raising of dairy animals; high levels of calcium in the diet mitigates the mineral-depleting effects of phytic acid.
- Soaking grains and flour in an acid medium at very warm temperatures, as in the sourdough process, also activates phytase and reduces or even eliminates phytic acid.
- Another study showed almost complete elimination of phytic acid in whole wheat bread after eight hours of sourdough fermentation. (Source)
- The true sourdough method (no yeast used for rising) may even help break down much of the gluten, or at least decrease gluten intolerance. Many who can't tolerate grains are often able to eat a true sourdough bread without issues since it's so much easier to digest. Here's more information on this from Sarah, the Healthy Home Economist:
- While yeast is used almost universally for baking breads now, the skyrocketing cases of gluten intolerance and celiac disease are causing many to look backwards at how non-industrialized peoples consumed gluten containing breads with no digestive difficulty.
- One study that examined how celiacs tolerate true sourdough bread was conducted in Europe. 17 people suffering from celiac disease were given 2 grams of gluten containing bread risen with either baker’s yeast or a normal lactobacilli culture. 13 of the 17 showed negative changes in intestinal permeability consistent with celiac disease. 4 people did not show any negative changes. Then, the 17 study participants were given true sourdough bread risen with a special lactobacilli culture able to hydrolyze the 33-mer peptide which is the primary amino acid building block that causes an immune response in people with celiac disease. None showed any negative changes in their intestinal permeability after consuming the bread which was made up of 30% wheat flour and a mix of oat, millet, and buckwheat flours.
- These results showed that a bread biotechnology that uses selected lactobacilli, nontoxic flours, and a long fermentation time is a novel tool for decreasing the level of gluten intolerance in humans.
- Lastly, remember to keep in mind when you're buying a loaf of sourdough, to make sure there is no yeast listed in the ingredients so you know it's a true sourdough bread. A true sourdough bread is one that needs a long, natural rise. Make sure there are no funky ingredients in there, either. The only ingredients should be pronounceable and clearly recognizable. Preferably organic. I've seen some with just water, wheat flour, starter and sea salt, but others may also have apple cider vinegar too.
Lucinda's No-Knead BEST Sourdough Bread Recipe
I'll add my own comments in italics below from the notes I took as she was speaking. Note that there are lots of links below so you know exactly what ingredients and equipment to get and where you can find them.
Sourdough Baking Ingredients:
- 1 cup Sourdough starter* (starter info is below) – Get a starter from a friend or click here to start one yourself using this packet of sourdough starter.
- 19 ounces well or spring water—from faucet or room temp, NON-chlorinated water. If you use reverse osmosis water like we do (to remove Fluoride, chlorine, pharmaceutical residue, pesticide toxins, etc.), then Lucinda said to just add some mineral drops to it like these Concentrace drops. This may be why my sourdough bread hasn't been successful in the past, because I was using dead RO water! By the way, if we had it to do over, we'd buy this water filter system instead. You can read more about water filtering here.
 NOTE: A commenter named John (see his comment below – #32 right now, but that may change as new comments come in) had some different viewpoints to share on a few ideas in this post that you may want to check out.
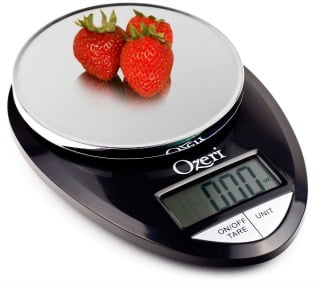
 - 9 ounces whole wheat flour, freshly ground if possible, but you may want to sift out big pieces of the bran. Measure flour with a kitchen scale for best results. Lucinda uses whole wheat, which you can get here, but I like using alternative grains when I can, such as spelt. She said this is fine, but it may take a little more, go by how it feels. (She said not to use Rye, though, as she hasn't had good luck with it. Which is too bad since according to Rami in this article, that's the best grain to use in sourdough to break down the most anti-nutrients…) I'm growing my starter now with spelt, so I'll keep you posted. Spelt is another type of wheat, but more traditional and tends to not cause problems in some who are sensitive to regular wheat. Although, the sourdough process itself helps minimize those issues as well, as mentioned above. Read more about using alternative grains here. If you're not planning to grind it fresh, you can get whole spelt flour here. If you DO plan to grind it yourself, you can get spelt berries here or einkorn berries here. And here's the grain mill I use and more about why I love this one. (Is that enough links for you?!) Remember I haven't done this successfully yet, so you may want to follow Lucinda's instructions exactly to be sure you'll have good luck!
- 16 ounces unbleached, un-enriched all-purpose white flour – Lucinda uses Natural Way Mills Gold n White Flour—available from Country Life www.clnf.org and UNFI www.unfi.com, or click here for the kind I use. You could also use this einkorn all-purpose flour.
- 2 1/2 teaspoons finely ground sea salt


Instructions:
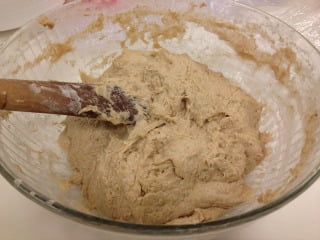
- In a large glass, ceramic, or wooden mixing bowl (no metal bowls), break up 1 cup Sourdough Starter in 19 ounces water.
- Add 9 ounces Whole Wheat Flour and mix with wooden spoon.
- Add 16 ounces unbleached, unenriched all-purpose flour and 2½ teaspoons salt.
- Mix together. Dough should be very thick and the last bit of flour should be a bit difficult to work in.
- Cover the bowl, and let sit for 6 to 8 hours, then refrigerate dough for 24 to 48 hours. (I have left it for up to two weeks, but it does not raise quite as nice after that long—still tastes great, though!) Lucinda says that sourdough is very forgiving, much more so than yeast breads, as far as timing. If you have to leave for a while, just stick it into the fridge and continue when you're home.
- Remove dough from refrigerator. Allow to warm up for 1 to 2 hours.
- Scrape dough onto floured surface. (Lucinda uses this baking couche since she bakes bread a lot and it wastes less flour since you just fold it up and reuse it each time, and it's easier for clean-up, too.)
- Fold envelope style 3 to 6 times. (Bring one side up, push into the middle, bring another side up, push into the middle, repeat as you go around the four sides of the dough.) You don't want to work the dough too much, Lucinda said, “Remember this is a no-knead recipe after all.”
- Place in proofing basket for 2 hours. (Click here for the Brotform proofing basket Lucinda uses.) From Lucinda: “Don't let it over-rise, it overworks the yeast! If it's rising too fast, put it in the fridge, it gives it a rest, but it won't fall. Slowing down is sourdough's best friend.” Also from Lucinda: “Do not use soap on this basket and only handwash, and as a matter of fact, I only wash mine rarely in order to utilize the bacteria from the air to make the dough healthier.”
- Preheat oven and 5 quart cast iron dutch oven with lid to 450 degrees F. for 25 minutes.
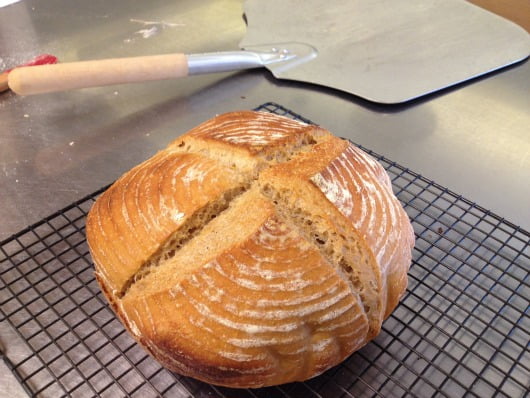
- Carefully remove dutch oven from pre-heated oven and drop dough into the ungreased pan. If you desire, you can make slashes with a serrated knife. (If, like me, you have trouble dropping the dough in the pan, you can invert it onto parchment paper, make the slashes, and then use the paper to lower the dough into the pan.) Cover with lid and place back into the oven. Bake for 35 minutes. Remove lid, lower oven temp to 400 degrees F., and bake for 20 minutes.
- Remove and cool bread on a cooling rack. Wait at least 45 minutes before slicing.

 *Sourdough Starter Notes:
Start with an active starter from a friend, OR you can click here to start one yourself using this packet of sourdough starter.
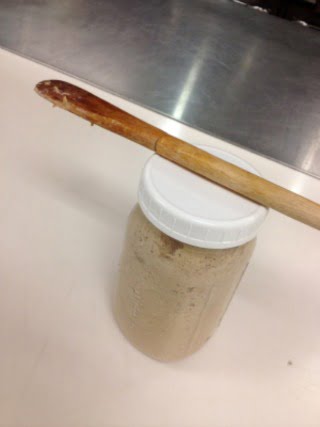
I make my sourdough starter very thick. I like to store it in a 1 quart, wide mouth jar. That way I can see that it is developing the tiny air bubbles throughout after I feed it. I do not measure anything when I feed my sourdough. I just add whole wheat flour and a little well water and stir with a sturdy wooden spoon. If it is not thick enough, I add more flour. If it is too thick, I add a little more water. The starter should be so thick that it holds its shape and does not flatten out when you stop stirring. As it raises, it will become thinner. Healthy sourdough starter should rise to double within 12 hours after feeding. I like to feed my sourdough about 8 hours before I am ready to start bread in winter and 5 to 6 hours before in summer. The starter only needs to be fed every 24 hours if you are leaving it out on the counter. If you are building up starter and want to build it faster, you can feed it every 12 hours. When you need a break from the starter and from making bread, you can refrigerate it, making sure to feed it at least every 2 weeks. If you are storing for longer periods of time, discard half of the starter and feed every two weeks. You can use the “discarded” starter for pancake, waffles, English muffins, or crackers. (Click here for those recipes!)
Quick-view Sourdough Shopping:
Sourdough Baking Equipment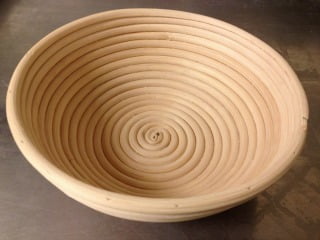
- Brotform basket for proofing
- Parchment paper, unbleached
- Baker's Couche—flax cloth for folding dough or proofing oblong loaves
- 5 quart cast iron Dutch Oven with lid
- Flour storage containers
- Kitchen scale—flour measurements are most accurate when weighed
- Non-reactive Bread Bowl—can be glass, ceramic, or wood (no metal bowls)
- Sturdy wooden spoon—best to have a thick handle as this bread dough can be hard to stir
- 1 quart wide mouth glass jar with plastic lids for starter
- Cooling racks
Sourdough Baking Ingredients (I copied the info from above to make it easy to find here.)
- Sourdough starter from a friend or click here to start one yourself using this packet of sourdough starter.
- Well or spring water—faucet or room temp, NON-chlorinated water. If you use reverse osmosis water like we do (to remove Fluoride, chlorine, pharmaceutical residue, pesticide toxins, etc.), then Lucinda said to just add some mineral drops to it like these Concentrace drops. This may be why my sourdough bread hasn't been successful in the past, because I was using dead RO water! By the way, if we had it to do over, we'd buy this water filtering system instead. You can read more about water filtering here.
- Whole wheat flour, freshly ground if possible, but you may want to sift out big pieces of the bran. Lucinda uses whole wheat, which you can get here, but I like using alternative grains when I can, such as spelt. She said this is fine, but it may take a little more, go by how it feels. (Again, she said not to use Rye.)
- Unbleached, un-enriched all-purpose white flour – Lucinda uses Natural Way Mills Gold n White Flour—available from Country Life www.clnf.org and UNFI www.unfi.com, or click here for the kind I use. You could also try this einkorn all-purpose flour.
- Finely ground sea salt
Thanks for this recipe, Lucinda, I'm honored to have the Best Sourdough Bread Recipe from you here on my site! 🙂
I asked Lucinda to tell us a little about herself:
I grew up baking yeast bread starting from as far back as I can remember. I was blessed to grow up in a family that believed in making their own food. We lived on a farm and even had our own milk cow. When I was a little older, we moved to Togo, West Africa, where I got to eat wonderful European style artisan breads baked in clay ovens. I also got to do a lot of experimenting with making different types of yeast bread. I started playing with sourdough recipes in the late 90's after falling in love with the sourdough bread from Zingerman's Bakery. My bread was ok, but it never had that chewy crumb I wanted. Later in the early 2000's I tried again for a couple of years, but no matter what I did, the bread still wasn't right. Finally early last year, I decided to get some starter from a friend and try again, this time with a no-knead version. Finally the bread had the chewy crumb I was after! I spent the last year and a half experimenting with the recipe to get the bread I have today.

Kevin N Lisa Campbell says
This is my go-to sourdough recipe and have had many requests for the recipe. My whole family loves it. I sometimes soak a cup of Red River Cereal and just add, for a really lovely loaf with lots of texture. Thanks Kel!
Lisa
Lisa Campbell says
Wow, what a lot of comments on this! After a long day, I decided to just skip the folding part of the recipe and just gently scoop the dough into my baking dish. It keeps more of the rise and is incredibly light and fluffy.
Kelly the Kitchen Kop says
Awesome Lisa, thanks for letting us know!!
Xoxo,
Kel
Dani Kelley says
Sourdough is very forgiving, and one of my favorite recipes involves using extra starter to make waffles!
Jill-David Boman says
Love sourdough pancakes and waffles!
Kevin N Lisa Campbell says
I have been using this recipe for years, sell my bread and have never thrown any starter out.
kitchenkop says
I agree, Amy! Did you see the sourdough recipe in this einkorn book, that might be another option to try too: https://amzn.to/1MrpUoc
Kelly
Amy G. says
Thanks – I looked at the recipe and will dive in one of these days (I hope.) 🙂
Amy G. says
I really want to make Einkorn sourdough bread, but I have to say that even reading about doing this for the first time makes me “tired.” Thanks for the recipe and help. Man, I wish this were available to purchase!
Christine Allsup says
I remember seeing this as a kid (yep, I’m dating myself). Such a great show. I wish we had this kind of quality on TV now where the whole family could watch together. 🙂
Chris Kerston says
Why aren’t these on Netflix?
Kelly the Kitchen Kop says
Good question, Chris Kerston! Those were so great!
Leila Mohamed says
Its on hulu that’s where I watch it 🙂
Susan Jaeger-Barker says
Nancy Estrada…thisi reminds me of some of our adventures the past 38 years…..
Kelly the Kitchen Kop says
Kind of reminds me of my food flop picture: https://kellythekitchenkop.com/friday-food-flop-91010/

Schlechten Wolf says
Well now I know why I had so much trouble with my sourdough starter. (using the wrong type of water). Thanks! Does anyone know if I have to keep the sourdough starter away from my kombucha or kefir that I have fermenting or frankly any ferments?
Kelly the Kitchen Kop says
Schlechten Wolf — yes, I’ve heard that having it too close to other ferments CAN mess things up.
Lauren Sandler Upton says
I wish I could find someone with starter.
Kelly the Kitchen Kop says
Check the link, Lauren Sandler Upton, you can actually start it yourself.
KitchenKop says
Barb, we’d love to hear how you do it if you’re willing to share?
Kelly
Lisa Johnson Bonacorsi says
I have to try this.
barbwarman says
we eat a lot of Sourdough in Germany . I make my own starter,,just taste better
Jan O'Brien Schaefer says
I used to make sourdough bread and pancakes all the time. I got a starter from my neighbor. It was delicious. As the kids left the house, I quit making it so my starter went south. Seeing this post makes me want to make some more.
Kelly the Kitchen Kop says
I think you should go for it, Jan O’Brien Schaefer!
Judi says
I want to make my own starter. Is that possible. I thought my mom made her own starter and she just gave me some. But I don’t have it any more. I think my mom had a book that told how to do it. But I was hoping someone may have a better, healthier way to do it today.
Judi says
OK, I found an answer from Heather on 9/24/13 which I will try.
Maggie says
Hi! First of all, thank you-this bread is lovely! I only had one issue-the dough didn’t hold form at all whenever i tried to move it anywhere! It just spread out all over and stuck everywhere. I had to scrape it all off the basket into the pan! It didn’t seem to affect the final product too much, as it still rose and tasted great, but i was wondering what i could have done wrong? Thanks!
KitchenKop says
Well, Lucinda hasn’t been feeling well, so I’ll try to answer this one: I think (not sure) that you may need a little more flour?
Kelly
Teresa says
I know this is an older post, but I hope I can still get an answer. I purchased a spelt sourdough starter and have been feeding it for a couple weeks now, but I am having the same problem one of the early posters mentioned: the starter bleeds out moisture, and although it bubbles it does not rise. Also, the starter seems very thin and loose even when I do not add much (or any) water when I feed it.
I tried to make pancakes with some of the extra starter and they were so thin I decided that they would be crepes instead. However they didn’t seem to want to cook in the center even though they were very thin. I cut them into squares and baked them until crisp, and the resulting crackers are delicious, but not what intended when I began.
I am concerned that if I try to bake bread with this starter I might just end up with a gloppy mess or an inedible brick, especially since I am a novice and have no idea how the dough should feel. I am using whole grain spelt that I ground and then froze to feed my starter. Kelly, you mentioned spelt so I am wondering if you have tried this recipe using it. I would appreciate any tips anyone might have on how to bake spelt sourdough bread. Thanks.
KitchenKop says
Hi Teresa, I’m no help because I don’t make this bread regularly, but I’ve emailed Lucinda to see if she could jump on. 🙂
Kelly
Kirsten says
Im new to sourdough and making this for the first time. I put the dough in my fridge for 48 hours. I covered it with a damp cloth but when I took it out it had dry areas on top. What should I do? What did I do wrong?
Thanks
Lucinda says
You can try to just knead the dry areas into the dough when you fold it. In the future, use a tight fitting lid or plastic wrap to seal the bowl so the dough does not dry out in the fridge. Hope this helps!
Christine A says
Good Morning,
I’m basically out of control with the sourdough starter. I’ll put it in the fridge and then pull it out again and feed it. I can’t stand the idea of throwing any away. 🙂
The bread is amazing as is the sourdough waffles! Delicious and frozen for when we want to pop one in the toaster.
Is there an update on the Sourdough Cinnamon rolls? *fingers crossed*
Thanks and Happy Thanksgiving!
Christine
Christine A says
My little scale isn’t working and I never thought I’d have to buy another. 🙂 Ok, so it’s the weight and basically it’s a ‘see it, feel it’ technique. That makes me less frantic about measurements then. Thank you for chiming in.
Oh, side note: I used the starter too soon. After taking out a cup for the bread and feeding it, it bubbled all the way to the top of my quart mason jar and stayed there for a long time. Hopefully the bread dough in the fridge will be active. Either way this is has been fun.
Thanks!
KitchenKop says
I know, it’s kind of fun playing around with it! 🙂
Kelly
Christine A says
Unbelievable. The bread turned out fantastic! This is how bread SHOULD be made. Flour, water, salt.
I’m so happy I found your website. Lookout out world!
Christine 🙂
Lucinda says
Great news, Christine! I love it when people are able to make their own bread!
KitchenKop says
Woohoooo!
Lucinda says
I do suggest that you weigh your flour due to the fact that flour measured in cups measures differently every time depending on how compacted your flour is at that moment.
If you go with the cup measurements, please remember to adjust your dough to the correct consistency. If the dough is too wet, add more flour. If it is too dry, add more water.
Christine A says
I don’t mean to be a pill, but I’m mathematically challenged. So;
Add 9 oz Whole Wheat Flour and mix with wooden spoon. **This means 2 1/4 cups?
Add 16 oz unbleached, un-enriched all-purpose flour and. **This means 4 cups?
I also get lost in my own city…
Thanks! 🙂
Christine A says
Ok, I really did try to find this answer myself but I will run it by the Rocket Scientists:
For 16 oz dry to cups measure: 16 ounce [weight] = 3.6310000000000002 cup [US]
For 9 oz dry to cup measure: 9 ounce [weight] = 2.042 cup [US]
Here’s the calculator: https://www.onlineconversion.com/weight_volume_cooking.htm
KitchenKop says
I’ll give Lucinda a nudge and hope she’ll jump on to clarify. 🙂
Christine A says
Thank you. 🙂
Marion says
I see in the comments that the measurement for the starter is 1 cup or possibly some weight measurement? But the recipe above lists no measurement. It would be nice to have a simplified version of the recipe for printing as well, without all the links. Thanks!
KitchenKop says
Hi Marion,
I just fixed the recipe to say 1 cup, thanks!
For printing, I’ll try to simplify it when I get a chance (have to wake the kids up for school now, so no promises when I’ll get to it!), but for now, just copy and paste the whole thing into a document and then you can delete what you don’t want before printing.
Kelly
Lucinda says
The starter measurement is 8 fluid ounces, which is equal to 1 cup. Fluid ounces are measured, not weighed.
Christine A says
My starter is bubbling – Day 3. I’m excited about this recipe. I haven’t baked sourdough in a long long time but love bread baking.
I have frozen 37 year old starter (I know…) that I feed about once a year, watch it bubble, make sourdough pancakes and then back in the freezer.
KitchenKop says
Wow, let us know how it goes!!!
Kelly
Christine A says
I sure will! 🙂
Elvin Gomez via Facebook says
Sprouted grain breads are healthier
Don-Colleen Farmer via Facebook says
Where does pumpernickle stand on the scale?
Barbara Ann Center via Facebook says
I don’t like sour dough…at least not the ones I’ve tried.
Kelly Garrard Smith via Facebook says
I wish it was that easy to make a gf sourdough. 🙁
Yvonne says
I can’t even handle how good my loaf of sourdough came out with this method! I made Sherlock…haha..just a few weeks ago. (My starter) I’m new at this whole, using wild yeast to bake with, thing. I’ve been looking for just the right recipe/method and have tried a few with mediocre results. I am dancing around the kitchen and annoying my husband with too many shouts of, “Oh my god! This is insane. It’s perfect. Gorgeous! Do you see that crackly top? Do you?” I didn’t have a basket to proof in, so I put a thin cotton kitchen towel in a bowl and dusted it with flour and hoped it would work. Then I flipped it gently on to a piece of parchment, slashed it and lifted it gently into my enameled cast iron pot. I am in love! Thank you! I need not look any further.
KitchenKop says
Great Yvonne, I’m dancing with you! 🙂
Kel
Noahla Purdy says
This is THE best sourdough tutorial ever!!! I have been working with sourdough for about a year and a half. I have had some decent success but nothing compared to this method!! Thank you so much!!!! Everyone loves it! It is way better than store sourdough bread!!! I use Einkorn for the whole wheat part. I want to try it with adding more Einkorn eventually, but for now, I’m just reveling in my sour dough success!!! Thanks again!!
P.S. Are you going to add posts about the best way to make English muffins etc?… I’ve also made those in the past but think they could be improved!!
Lucinda says
I am scheduled to teach a sourdough cracker class next summer (July 2015). Maybe Kelly will post pictures from that. We will have to see about the English muffins!
Cindy L. says
I agree a cast iron dutch oven is ideal, but for those who can’t afford that kind of equipment at full retail or find it at closeout prices, a well-greased glass casserole with fitting lid heated as per directions will yield very good results.
Cindy L. says
Just another note here. You can use whatever type of flour you want for sour dough starter. It gets so broken down that it doesn’t affect final product, it’s just the culture medium. Use what you have for that, and use your preferred flour for your bread. Do not be intimidated. It may not come out like a perfect sour dough loaf in a restaurant, but you have no idea what they used in theirs and it may even contain yeast. And grocery store or bakery loaves may contain conditioners or other unnecessary ingredients for consistency of product. So don’t compare yours to theirs. Listen to Nike (think it’s theirs): just do it!
You will need a strong thin serrated blade to cut your resulting loaves. Some may be crustier than others. If they’re harder than you like, use it for bread pudding or toast with lots of butter. Then try again. And white flour isn’t necessary. It is used to produce a softer fluffier loaf. But that’s just because we’ve been “conditioned” (sorry I couldn’t resist) by food manufacturers to expect this. They are not making real food. WE ARE. Don’t try to copy fake food. This is no disrespect to the contributor’s recipe. Her family may have these expectations and she is trying to lovingly accommodate their tastes. We have dropped white flour entirely — but I may get a sifter for my Komo to reduce some of the hulls which can cause irritation to the bowel – and they eat what they are given. It’s fun to hear their comments on the bread as each loaf comes out slightly different. Oh this is softer, this is chewier, this is denser, etc. They usually like the taste no matter what.
Not trying to stir the pot. I just really want to put out the word on how easy and accessible this is for everyone. And if you don’t have a dutch oven, you can use a glass casserole dish with a lid, well greased and preheated as above also. The cover is important. That gives you a crisp tender crust.
Thanks for listening and sorry for uncaught IPhone typos!!
John says
I don’t mean to stir the pot either but I do have a great deal of personal experience with this and I think everyone should be able to make awesome bread at home with just a bit of care and a good formula to work from.
In my opinion the flour you use in your starter matters a great deal because you are dealing with a specific strain of yeast (and bacteria) that have been bred to eat a specific type of flour. I don’t mean brand, I mean type like wheat vs rye or even white flour versus whole wheat. There is a reason why sourdough starter companies online sell specific strains for specfic types of flour such as a rye starter or a spelt starter or a whole wheat starter.
The reason for the dutch oven is to give the loaf moisture as it’s baking and a very even source of heat for best oven spring, the crispy crust comes either way. In a commercial bakery oven you can set the moisture / humidity level while baking and a natural hearth type oven gives a very crispy bottom, the dutch oven is to replicate those two things at home. I imagine just about any non airtight container would do for the moisture part but the dutch oven really gives you that crispy bottom if that’s what you like.
Following a bread formula is not a matter of trying to make some kind of ideal “perfect” loaf, it’s about having an edible loaf. Baking bread is not like cooking a regular dish, you can’t do it by feel, you just might get inedible gunk, unless you have a great deal of experience so following an accurate formula that gives exact reproducible measures in weight (not volume) for all parts of the formula is crucial for a beginner starting out.
Again, not trying to stir the pot, I just really think everyone should be able to make great bread and the first part of getting into that for a beginner is having success right from the start they can build on.
John says
Kelly, I’ve been baking sourdough for many many years, stumbled across this article looking for a no knead idea for sourdough since my mixer died last time and I wanted to experiment. I have some suggestions after reading this post.
1) You do *not* need to feed sourdough every two weeks in the fridge. You can go many many months without feeding it at all.
Just pour off the liquor that accumulates when you go to use it and give it a good stir and use a teaspoon of it to make a new batch of starter the day before you bake with extra and then completely replace whatever was in the fridge before with the newly made extra starter. This has worked for me for over 15 years now straight.
2) An experienced bread maker like Lucinda might be able to tell if they are at their favorite consistency by feel alone but there is no way on earth any of your readers will. A bread formula requires exact weights and percentages for reproducible success. Starter needs to be always consistent if you are going to use so much in the recipe so that you can calculate the moisture percentage. Your readers are going to have wildly different results with this formula due to the starter issue alone.
3) starters are matched to specific types of flour. If you want to use another grain such as spelt you need a starter for spelt. You can’t just randomly switch flours. Even whole wheat versus white makes a difference. You can adapt a starter by slowly feeding a higher and higher percentage of the unusual flour to a starter over a long period of time but it’s much easier to just buy a rye starter (for example) than to try to develop one.
4) I used chlorinated city water for making sourdough bread for many years and honestly I never saw any difference either way. I think it’s an unnecessary complication to filter the water.
It’s easy to follow a standard recipe or to produce one on a blog, but a bread formula is an entirely different matter, without an exact formula it’s a shot in the dark at best what you will get as a beginner.
John says
Almost forgot:
6) I regularly use a stainless metal mixing bowl to make sourdough, it has no effect whatsoever.
KitchenKop says
Hi John, you’ve added some great info here and I’m going to add a nudge in the post so that people see this, thank you!
Kelly
Cindy L. says
I agree about stainless. No effect at all. And remember to change your vessel if you’re making your own starter. Disagree about flour types. Agree on environment. My process won’t necessarily work in your house. Disagree on feel. That’s how I cook/bake. Can’t tell you how many recipes I’ve tried and felt in my gut that they weren’t quite right. My rule is follow the recipe the fest time. Then I tweak. For mixing, a Swedish dough whisk is excellent. (They’re made in Poland now I see).
Sour dough is for everyone. Whether you’re experienced or not. Bread is fickle. Results depends on humidity and surrounding environment. Baking time isn’t fixed, it’s a check and see at this time, etc. If you use your hands you get a good sense of the dough. On a wet day you’ll need more flour, dry day, less.
Rachel says
Thanks for the recipe, sounds just right for the starter I’ve been feeding up to use. I’m wondering if Lucinda has perfected and passed on her sandwich loaf and cinnamon roll recipes yet?
Lucinda says
Hi Rachel, I don’t have the recipes ready for prime time yet…stay tuned!
Teresa says
I have been making a 100% whole wheat sourdough sandwich bread for a while and it’s good.. I want to do a artisan style sourdough like this but I would want 100 % whole wheat, if anyone has that !
Tim McCormack says
I noticed an error in your post.
…but according to the stuff you quote right below that, breaking down the gluten requires a specially bioengineered bacterium. There’s no evidence that wild fermentation is going to reduce the gluten content.
Julie says
Hi,
was wondering about the starter. Mine is quite a wet one- compare to how you describe yours anyway. When you say “break up” the starter with 19oz water- would you use the same amount of water to starter if the starter was more of a pourable constancy?
Cheers Julie
Lucinda says
Hi Julie,
If you are using a much wetter starter, than yes, you would want a little less water and a little more flour in the recipe. Essentially you are just making up for the difference in the starter consistency. Since your starter has more water and less flour, you adjust accordingly.
Lucinda
Sarah says
What adjustments would you make to this recipe for a free-form loaf baked on a pizza stone? I have been sort-of combining the instructions between this one and the one found here: https://nourishedkitchen.com/no-knead-sourdough-bread/. I also don’t have a proofing basket (may get one in the future, but not right now), and I have been having issues with the dough spreading rather than rising during the proofing phase. Any advice or suggestions would be very appreciated! Thanks! 🙂
Lucinda says
Hi Sarah,
This loaf can be made that way, but you still have to proof it in some sort of bowl or basket. That would explain why the loaf is spreading instead of rising. It needs support to rise. You could make baguettes by shaping and placing in a very well floured flour sack type towel and supported by boards or bricks while proofing. Otherwise, just get the equipment and you will be just fine!
Lucinda
Stephanie says
I had a question about the water used in the sourdough starter, I don’t have access to a water filtering system at this time (it’s on the list 🙂 ) and I know Lucinda said to use NON-chlorinated water but could I use distilled water or spring water from a jug at the grocery store? I’m just beginner so I want to get it right, ya know…. If I can’t use that then what other water could I use?
Thank you for your wonderful posts and the time you put in them, absolutely brilliant!
Thanks again,
Stephanie
Lucinda says
Hi Stephanie,
Spring water from the store would be fine. If you use distilled water, it is a good idea to add a couple drops of trace minerals to the water.
I hope this helps,
Lucinda
Stephanie says
Thank you Lucinda for the quick reply and the info.
Now I can start my sourdough starter, sooooo excited!
Stephanie
Lucinda says
The amount of starter used in any sourdough recipe will vary. You will need to follow the recipe…or get adventurous and make up your own!! My bread recipe uses 1 cup of starter.
Emily says
Hoping someone still monitors these comments, as I’d like to echo Gina’s question about how much starter to use in this or any recipe (is it always the same?).
Emily says
Also some questions on equipment: which is preferred: a cloche (not ‘couche’) (description from KAF website: “Brick-oven baking at home! Porous clay cloche perfectly cradles bread as it rises. Cover with the lid and the trapped steam creates a crunchy, chewy crush.”) or brotform? Also, brotform with or without a liner?
And is baker’s couche necessary for supporting rising baguette loaves? Sure I can image it might give them a nicer shape but is it necessary for any part of the proofing/baking process?
KitchenKop says
I’ve emailed a nudge to Lucinda, hopefully she’s able to reply!
Kelly
Lucinda says
Hi Emily,
As far as the equipment questions, I don’t feel like the cloche is good for raising the dough. I have used them for baking, but only after raising the dough in a brotform. As far as a brotform with or without a liner, that is a personal choice. I like mine unlined, but that is because I like the flour design left on the bread. If you don’t have a baker’s couche for raising baguettes, you will have flat loaves. You do have to have something to support the loaves while they are rising.
Heather says
Making a starter is not difficult. Use a 50/50 all purpose flour and whole wheat mix or just an AP flour. I started mine with organic unbleached white flour. Start with 1/2 cup flour and a scant 1/2 cup water ( I use water from our reverse osmosis filter and my starter has always gone like gangbusters). Stir together vigorously; you are incorporating air into your starter, which helps get the yeasts going. You may use any sort of utensil for this — I like a small rubber spatula. Place your container somewhere out of the way. I have seen recommendations both to cover and not cover the starter. If you have fruit flies, you will want to cover, at least loosely. I covered mine very loosely with a jar lid. Now wait. My kids and I did this as a science experiment this summer and we predicted how long it would take for the starter to “start.” We made a graph of everyone’s predictions and then charted the actual results. Ours took 8 days from the initial mix to begin throwing off bubbles. You may have to add a little water or stir it a bit during the wait. I uncovered mine periodically to give it a stir and smell it (if it starts to smell beery or yeasty, you’re in business).
Once you see bubbles, begin feeding your starter. Discard half of the mixture, add 1/4 cup flour and a scant 1/4 cup water and stir. Repeat every 12 hours, discarding half the mixture each time. You are ready to make bread when the starter easily doubles in volume in a 12 hour period. When you are “feeding up” your starter to make something, you don’t have to discard, but you always need to add the same amount of flour/water as starter (so if you have 1 c starter, add 1 c flour and a scant cup water).
I like my starter a little on the wet side, especially if you are getting one going. I think the wetter conditions are more hospitable for the yeasts and bacteria. You could use less water once your starter is established.
To store your starter, at the time you normally feed it, discard 1/2 and feed as normal, then place in a glass jar with the lid loosely tightened and place in fridge. It’s a good idea to label the jar: mine looks just like the homemade bleu cheese dressing, but you totally don’t want sourdough starter on your lettuce. Bleah. You can store it for at least a week, and probably longer. The longest I’ve ever let mine go is 10 days, so I don’t know what the outer limit is.
Once you have a starter, offer it to everyone you know — that way if you lose it for some reason (like pouring it on your salad) you can get a start from a friend without having to go through the whole process again.
Cheers!
Judi says
Thank You, Heather this is the answer I was looking for as I want to make my own starter. Having a starter from our own locality seems better to me. The only difference I see from what my mother did was she used skimmed milk instead of water for the liquid.
Gay says
Lucinda or anyone else have a recipe for making Riga Rye sourdough bread? It is 100% rye flour. It’s outrageously delicious and very dense. We are getting tired of hauling it back in our suitcases and being out for most of the year. Would love to make it myself. Here is the website with more info on it. https://www.laci.lv/index.php/eng/ Thanks for any ideas ideas!
Gina says
Hi there- is there a way to get the measurements in “cups” verses ounces? Also how much starter per batch? It just says “starter”, thanks!
KitchenKop says
The first instruction actually says 1 cup of starter and then it lists ounces for the fluid. I think I remember Lucinda saying she does it that way in her recipe because it’s more accurate.
Kelly
Lucinda says
There are 8 fluid ounces in a cup, so when you are doing liquid measurements, each fluid ounce is equal to 1/8th cup. If you google your measurement conversion, there are calculators on the web that will convert…or you can challenge your brain and do the math!! 🙂
Jesse M says
Can’t wait for the next post with all the other recipes, I have been baking sourdough bread for a few weeks now and I am LOVING it!!!! Can’t wait to try more recipes 🙂
Julie says
Thanks, Lucinda for working and perfecting your recipe and technique. One question: what variety of sour dough starter do you find works best for you? At the site you linked to there are many varieties
KitchenKop says
Julie, that link was actually one I added, so I’ll be curious as well to find out which one she might recommend if you don’t have a friend to get some starter from.
Kelly
Lucinda says
Hi Julie, I think I would start with the whole wheat or spelt starter, depending on whether you want to you whole wheat or spelt for your bread.
majojomor says
Be careful using Spelt, I have tried it for starter and it does not have enough gluten in it to produce a strong starter….and additionally it bleads out too much liquid, so difficult to use what with less gluten for bread portion and therefore not great as a starter!
I experienced it first hand.
So if you Are successful I would like to know your method , please please?
ValerieH says
Maybe someday I’ll try this. Grains are one part of Real Food that I haven’t mastered yet. I love the no knead part. I wonder if I could use a hand mixer with dough hook to mix the batter rather than doing it manually with a wooden spoon? Another thing I wonder – the sourdough starter. Nourishing Traditions has a recipe (though it looks very large). Is there a reason for getting starter from someone else rather than making myself? I also wonder about the days before commercial yeast. People probably ate a lot of bread. How many bowls of dough were sitting around so they could bake every day? Most people lived in very small homes.
KitchenKop says
Valerie, Lucinda can say for sure, but I don’t think she’ll recommend a hand mixer, because you only really want to stir the dough just enough to work in the ingredients, overworking it wouldn’t be good for this recipe.
And I think, but again, not sure, that getting a starter from someone else just ensures that they have a nice, active starter going, and it’s not as hard for yours to take off from there.
Kelly
Lucinda says
You got it, Kelly! This kind of dough does not want to be over mixed, so just flex your muscles for a couple minutes and be done with it!
You can start your own starter, but that takes time. Plus it does not always get going well or gets contaminated and you have to start all over. So, to save time, get some starter from a friend…on the other hand, for a science project, start your own! It is a lot of fun!!
Cindy L. says
I don’t agree on the starter. Even a starter from someone else will change based on the ‘bugs’ in your own environment. So what it started out as will only remain the same in THAT environment. Make sense? Also, if you’re making your own starter, you want to feed several times a day and remove half of the starter to build up the colony. There’s good info on this to be found on the web.
Sour dough is easy and after all it’s only flour and water. So have fun and ‘get your hands doughy’!
Sarah says
Thank you, thank you, thank you! I have been successfully making sourdough for my family for a year now (Praise the Lord because without it one of my children has serious intestinal distress. We are not able to buy it where we live now.) However, it is an all white loaf (challah bread) and I am very eager to find one with more nutrition to it! I will be trying this tomorrow for dinner with arrival of my father in law who already thinks I cook weird. That was before the addition of breads!
Leia says
Thank you so much for this fantastic article! I appreciate Lucinda sharing her vast knowledge and experience with those of us still trying to figure it out. Is it possible to also grind your own all purpose white flour?