You won't believe how easy it is to make your own cheese! Shauna, an old online friend of mine, took a cheesemaking class a while back and now she's taught me to make homemade Queso Fresco cheese, which is a mild white cheese. Next I can't wait to try making mozzarella! She said there's only a little more to it, but assured me that it's still very easy and fast, too.
This cheese crumbles like feta, but tasted very mild like mozzarella. I only added sea salt and then crumbled it into a Mexican Lasagna, but Shauna said you can do anything with it. You can add garlic or other herbs and use it like you would any soft cheese. You could add jam or a little sugar and some cranberries for a sweet spread for bagels or crackers. It's very versatile.
Homemade Queso Fresco Cheese
Ingredients
- Half gallon of raw milk
- 3/4 – 1 teaspoon no-gmo powdered citric acid
- Sea salt to add in later or other herbs per your taste
Instructions
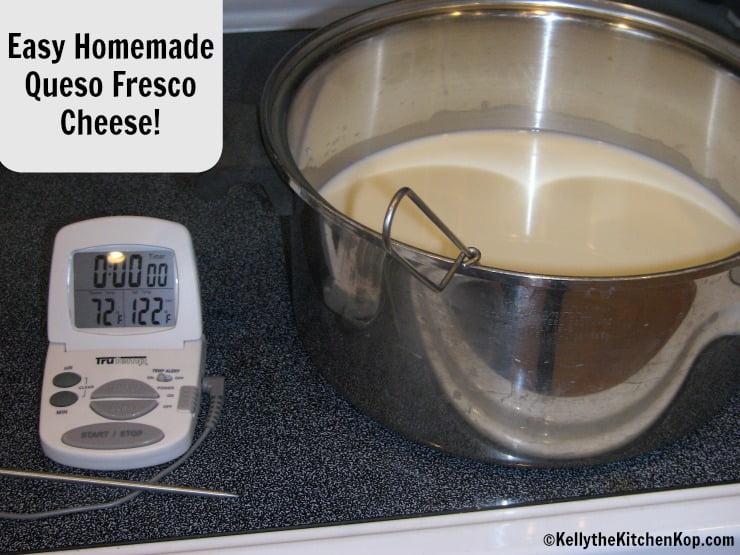
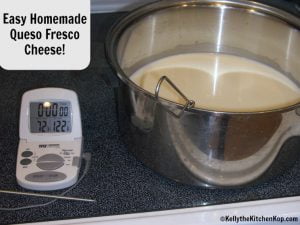
- Gently heat milk in a saucepan until it reaches 160*. Turn the heat off and stir in citric acid. As you stir, it will begin to separate and curdle, and will take less than 2 minutes or so. (At this point I think this is called cottage cheese.)
- Once it's mostly all separated and clumpy, pour the cheese onto a cheesecloth that is draped over a collander which is setting over a bowl. Tie the corners of the cheesecloth up and hang them onto a knob and let the whey continue to drain into the bowl.
- After about 45 minutes or so, it will be dry enough to crumble into your recipe, or add sea salt and spices and/or herbs or do whatever you'd like with it. Enjoy!

Isn't that Homemade Queso Fresco Cheese amazingly simple?
It only makes about 1 1/2 cups of cheese or so, you end up with a LOT of whey. Shauna has used it in her homemade bread (to replace the water) and said it turned out great. Or if you're using whey that hasn't been heated (like the whey in this recipe has), it is used to make lacto-fermented foods.
What else can we do with all the whey we have now? Also, let us know what are some other easy types of cheese to make?
***Don't miss all the great info in the comments below!
More you might like:
- Here's how to make simple yogurt cheese/homemade cream cheese!


Lee says
I’m not sure what I did wrong, but my milk didn’t curdle at all! I followed the directions precisely. It only had a few specs of curdled specs the size of pepper flakes that were stuck to the spoon. I used 1/2 gallon of raw milk and citric acid. Thanks!
KitchenKop says
Maybe it wasn’t warm enough?
Kelly
Evie says
I make a “yogurt” that is similar to what ya’ll are talking about. It is:
1 Gallon raw milk
1 cup whey or yogurt
Put in a roaster in the oven with the light on for about 12 hours.
Pour in cheese cloth a little (how ever much can fit) at a time till the whey strains out and I have dry crumbly like (it’s about the consistency of cottage cheese) yogurt 🙂
Its so good and cheesy tasting and my boys love it! I also give them the whey to drink with a couple drops of stevia. They love that too. Kinda like lemonade. 🙂
Amy says
Hi Kelly,
I just made this and it turned out really yummy! I added Celtic sea salt, dill, garlic powder, and creamed in a little Kerrygold butter. Oh, and the lemon juice works great…I didn’t have the citric acid.
Just wondering, since I heated the raw milk…are there any vitamins in here still?
Thanks,
Amy
KitchenKop says
Yes, just not quite as many!
KitchenKop says
Tammy, when I’m making cream cheese I always start with yogurt and don’t normally let it hang more than 1 1/2 days or so and it’s usually still pretty creamy. I’ve never started from raw milk…maybe someone else can jump in?
Kelly
Tammy Jo says
Hi Kelly,
I followed the PassionateHomemaking site and she linked me to you. I love your blog! Anyhow, many from our Co-op are all following Nourishing Traditions and learning how to cook all over again. I recently tried making cream cheese by just setting out out raw milk (covered). I thought I remembered 4 days, but it actually meant up to 4 days. Anyhow, after letting my “cream cheese” hang until the whey stopped dripping… I had my cheese. The only problem is that it is a little too dry. It isn’t quite creamy enough. Does anyone know if it was from letting it sit out too long or letting in drain too long? I guess I actually made some other type of cheese becuase it really isn’t that “creamy”. Thoughts?
Michelle says
Kelly,
I did it and it turned out great! I used 3 different recipes for ideas, yours included, and then I just wung it (haha past tense of wing it) and it worked. This is what I did:
1. Bring 1 gal. whole raw milk to 90F, add 1 c. whole milk yogurt, cover, and let sit 4 hours.
2. Raise temp of milk slowly to 100-ish so that it doesn’t pass 104F (that’s the definition of raw milk cheese, below 104.)
3. Add 1/4 vinegar, let sit about 30 min. for curd to form.
4. Strain into colander lined with porous towel, not cheesecloth. (Mix in salt, if you want it.) Hang and let drain, then squeeze dry.
5. Store wrapped in a towel in fridge overnight and that will dry it more. After I did this, it was crumbly just like the queso fresco at the store. I made chiliquiles (fried tortillas, salsa, eggs) for breakfast with it and it was awesome.
The whey did not come out clear like I’ve seen others’ and there was a lot more of it than what I’ve seen using rennet – but I’m using that to make bread like you suggested 🙂 The cheese is a little tangy, probably because of the 4 hours of souring with yogurt. I wonder if I could leave that step out and get similar results.
Oh, and this was the first time I ever did cheese other than cream cheese, so I’m no expert either!
KitchenKop says
Michelle, I’m new at this cheese-making stuff, so I don’t know the answer – if you try it, let us know if it works!
Kelly
Michelle says
Kelly- Any idea on how to make this cheese without heating it to 180? If it was heated to say 110 and then I added the lemon drops, would it separate? What is the purpose of the heating? I have mine on the stove right now and I am hoping not to mess it up! I’m trying to make raw queso fresco for dinner tonight…ha we’ll see if it works…
Victoria says
I haven’t tried this but whey can be used to make Beet Kvass see https://editor.nourishedmagazine.com.au/articles/beet-kvass for a recipe.
Kelly says
Jami, you can still use your whey (I’ll use mine in my breadmaking like Shauna does), but just not for lacto-fermenting. (Unless someone *has* done that and still had good results…???) To keep your whey raw, you can do what I do – make raw milk yogurt, then hang it to make cream cheese, and you have the raw whey leftover. Too bad I stink at lacto-fermentation, though! Someday I’ll experiment more with that again…
Erica, interesting… that will be good to know, depending on how dry I want my cheese to come out, what I’m doing with it, etc.
Thanks!
Jami from Arkansas says
I never really considered not using the whey from my cheese making. How high is too high a heat to use for lactofermenting? How do you recommend getting the best whey?
Martha says
Shauna, thanks for answering my question. Kelly, thank you for allowing and encouraging this! I learn a lot here. 🙂
Erica says
This looks remarkably similar to the recipe for the Indian Cheese Paneer…the only difference I see is that instead of hanging it to drain, you wrap it really well in cheesecloth, put it in the sink on a cutting board and place a heavy saucepan (or skillet) and let it squeeze the extra moisture out. Once it’s nice and compact, you can slice it and serve it in most any Indian sauce. Yum.
Kelly says
Kristin, thanks for the sites, next time I have extra raw milk again, I’ll check those out. 🙂
Katie, GREAT point, I’d better go fix that in the post… Thanks!!!
Shauna, PLEASE pipe in anytime, you know more about this than I do, and explain it so well, too! I’m very thankful for you. 🙂
That goes for all of you, ALWAYS feel free to jump in, it helps me when you can help each other, then I don’t feel guilty if I can’t reply to comments very quickly. 🙂
Shauna says
I should also note: the term “fresh” cheese is used to contrast with “aged” cheese. There are many varieties of fresh cheese, including also ricotta – which is a much moister cheese. The variances are often due to the length of time the cheese hangs, which yields either a very moist, spreadable cheese, or a more dry, crumbly cheese.
Shauna
Shauna says
I’m not Kelly…… but….
yes, cream cheese and “fresh cheese” are basically the same thing. The citric acid merely gives you a cheese that has not been “soured” first. If you don’t care for the sour taste, you might try it with the citric acid. The added benefit to the “slow method” is that you are culturing the cheese FIRST, so if you are wanting to get more beneficial bacteria and enzymes into your diet – the cultured cheese is a good way to go. The regular fresh cheese still has the raw milk benefits, it’s just not cultured first.
If you leave your cream out at room temperature before making it into butter, this is how you get “cultured butter” too.
Yogurt cheese is simply made by hanging yogurt in the same way and letting the whey drip out. The yogurt cheese would already be “cultured” by definition.
HTH.
Shauna (hope you don’t mind me piping in Kelly!)
Local Nourishment says
I did this the slow way like Martha. I set my gallon of raw milk on the counter until it separates from its cream. That generally takes a day. I refrigerated the cream for later. I let the milk sit out another day or two until it separates into curds and whey. I drain the curds into a strainer lined with cheesecloth, then hang the cheesecloth just like you did in your photo.
We love using leftover whey in smoothies. My teenaged son read about whey protein being used as a bodybuilder’s supplement and has begged for my jars of whey ever since! (Yeah, this is the kid who eats only Pop Tarts and Fluffer Nutters.)
Martha says
Fun post! I’d love to try this someday. I’m a little confused though. I thought that when I let my milk sit out until it separated and then drained it as you posted, that I was left with whey and cream cheese. I use my whey in fermenting, but never thought to drink it. I think I’ll add some the next time I make smoothies. Anyway, we spread the resulting solids on bagels and it tasted like cream cheese to me. It got too strong a taste pretty quickly though, at least for me. I’m still working on aquiring a taste for sour things.
Katie says
Hi Kelly
Just wanted to point out that since this is not a raw milk cheese (it’s cooked to 160 degrees) , you can’t really use the whey to do lactofermenting. Although you can definitely drink it still, all of the bacteria will be dead.
Congrats on some tasty looking cheese!
Shauna says
Your cheese looks GREAT Kelly! Yes, for the most part, you *can* interchange acdic mediums…… however, the gal teaching the class said that on occasion, her cheese didn’t turn out as expected with alternates. She said this is not so much an issue with the “fresh cheeses”, however, if you are making AGED cheese, it seems to make a difference. My understanding is that when it comes to aged cheeses, it is the particular combination of acid, rennett and enzymes that cause a particular cheese to be made (i.e. gouda vs. cheddar). I also had a friend who used lemon juice in a pinch, and her fresh cheese (queso fresco) came out fine.
Regarding amounts, just start with a little and see if it separates. Keep stirring – if you don’t see the curds coming together in a minute or so, add a little more. It is important to note, though that you want to sprinkle your acidic medium in as you are stirring – don’t dump it in one spot.
HTH!
Shauna
Kristin says
p.s. With whey, you can make a whey cheese the Scandanavians do. It is call Gjetost. It is on the Fankhauser site I mentioned above.
Kristin says
When you try mozzarella, take a look at the recipe a http://www.fiascofarm.com. It is oh so much tastier than the 30 minute recipes. Takes a bit longer and uses some culture and lipase but it is just soooo good.
Another great site for cheese is this one: https://biology.clc.uc.edu/Fankhauser/Cheese/cheese.html by a professor that loves to make it.
Julie says
Kelly, thanks for this. I have been wanting to learn how to make cheese and this seems easier than making mozzarella. clevermom, no wonder they call you clevermom for offering the tip of substituting lemon juice for the citric acid. (I await your reply to Kelly’s question about amount of lemon juice)
Kelly says
No kidding?????? Would I use the same amounts, too?
Thanks!
Kelly
theclevermom says
There is no need for going out of your way to purchase citric acid. You can just use lemon juice!