
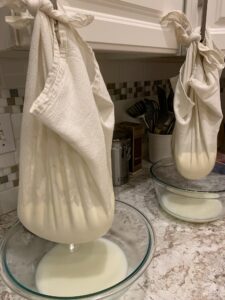
Kent never knows what he’ll find going on around here. I made a double batch of yogurt cheese last week so I could try some of the recipes in the most recent Wise Traditions Journal. I usually make it when we end up with extra raw milk for whatever reason. For the bigger batch I needed my cheese to hang up higher than normal to drain, and this is what I came up with…hanging it from the dining room light. Classy, don’t you think?
(Skip right to the ideas below if you're in a hurry…)
In this particular article, Jen Allbritton shared some great recipe ideas for getting more probiotics into our diets with raw yogurt cheese. As she explained, this cheese comes out creamy or crumbly, depending on how long it drains.
Read a few short excerpts from the article, “Growing Wise Kids – Enjoying Little Miss Muffet’s Curds and Whey”:
“Homemade curd cheese is a well-spring of nourishment. It is packed with protein, rich in healing fats (the best coming from properly raised grass-fed animals) and, most important, is an excellent digestive aid. Fresh, unripened cheese made from raw cultured dairy products is bursting with probiotic (pro-life) activity.
A hallmark practice among traditional cultures is to consume some sort of naturally preserved, lacto-fermented vegetable, fruit, beverage, meat and/or condiment at every meal. Tack homemade curd cheese onto your list of powerfully healing foods. And the best thing is, this cheese is so versatile, your family will be happy to include it in any meal!
Homemade, fresh curd cheese is the perfect complement or even replacement for sour cream in soups or dips and commercial cream cheese in spreads or desserts. It even does a fine job replacing mayonnaise on occasion. Best of all, curd cheese will take on any flavor, whether it be savory, salty, or sweet, so the sky is the limit when it comes to the possibilities with this ingredient. Heating homemade curd cheese will destroy the good bacteria, so I opt to keep mine raw as much as possible; however, there are times when it is the ideal choice for a certain soup or casserole–or you just have an excess supply.”
Which yogurt to use!
Important: use homemade yogurt to make this yogurt cheese, and if it's made with raw milk you'll have a probiotic cheese as mentioned above. OR you can buy some yogurt at the store, but be sure to get organic whole milk yogurt from grass-fed cows if possible!
How to make raw yogurt cheese and whey:
Also called “curd cheese” or “clabber cheese”, and very similar to cream cheese…
- I start by making homemade yogurt with my extra raw milk–my farmer friend Jenny from Six S Dairy showed me the easiest way: take a half-gallon of raw milk, stir 1/8 teaspoon of this culture into it, let set on the counter right in the milk jar for 24 hours. After 24 hours, you'll see that it's ready when it's all globby, because the curds & whey separate.
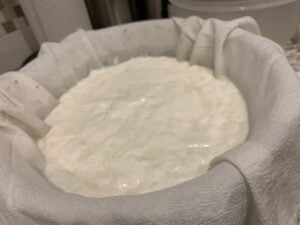
- Next place a colander over a bowl, set a thin dishtowel/flour sack towel like this kind into the colander, pour in the yogurt.
- Tie the corners together of the towel, or use hair ties like Jenny shows in the video below (I'm trying that next time, it looks easier!), and hang it from a cabinet knob. Or hang from a chandelier as pictured, it's super classy for when company pops in. 🙂 You could also use a really deep bowl, so the bottom of the towel isn't touching the whey.
- Let the whey drip out for another 24 hours.
- Next I usually try to squeeze a few more drops of the whey out, then scrape the cheese into a bowl and use it right away, or if you'll be storing it for a bit (up to 2 weeks and probably longer is fine), stir in 1 teaspoon of sea salt to help preserve it.
- Something else I just learned for a way to draw more of the liquid out and make it more like a thicker cream cheese from the store: place another clean thin towel into a bowl, place the cheese in there and wrap the towel over and around the cheese. Cover with plastic wrap and set back in the fridge for a week or so. This draws more moisture out without letting it get sour as it would if you kept it hanging out longer at room temperature.
- Here are Jenny's exact instructions and a video too.
- Somewhere I've also seen another idea: after you've gotten the cheese dried out well, roll into 1-inch balls, place in a jar and cover with olive oil–enjoy spread on sourdough. Apparently this keeps forever in the fridge (!!) and is a middle-eastern recipe called Lebneh. I'm trying it soon, but also adding herbs and spices so it tastes like those yummy marinated soft mozzarella balls from the store–but those have nasty canola oil and other junk in them. (Note to self: use quart jars with part olive oil and part avocado oil so the flavor isn't as strong, and then save the oil to reuse as we use the cheese.)

See below for all the recipe options!
Note that I use this yogurt cheese in recipes mostly, although some use it the same way they use store-bought cream cheese, on a bagel or cracker or piece of sourdough or whatever.
What you have left in the bowl is whey
This one gallon jar of whey is from when I made 3 batches of yogurt cheese (from 3 half gallon jars of milk):
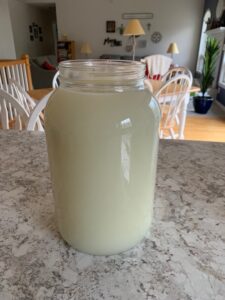
Some drink it plain because it is so good for us, but I use it in my fermented veggies, in homemade bread, or in superfood smoothies. Here are more ways to use whey! Jenny uses it in place of the water, milk or buttermilk in recipes and they turn out great.
Here are the yogurt cheese recipes I’ve tried so far:
- Probiotic Fudgesicles – They’re really good…at least I thought so. (Read more at that link about my picky kids.)

- Yogurt cheese dip – I think it tastes like the yummy garlic Boursin cheese we often use in recipes. Play around with different herbs and spices to make various dips for crackers or chips. Or something similar: this veggie cream cheese dip. One another similar one showing all the variations you could try: Cream cheese dip with many variation options.

- Add a layer of this cheese to your traditional lasagna or Mexican lasagna or Stuffed Shells (but these are cooked/baked recipes, so you're not retaining all of the goodies in the cheese, but it's still good for you though!)
- Taco dip

- I haven't tried it in cheesecake yet but plan to!

- Try this simple probiotic cream cheese frosting (recipe from a reader and guest-poster, Barb):
- 8 ounces yogurt cheese at room temperature so it's soft and easy to mix and 1-2 Tablespoons raw honey or other natural sweetener
- Mix the desired amount of sweetener into the cream cheese, whip to fluff a bit.
What else do you do with your yogurt cheese?
More you might like:
- Do you need a good probiotic supplement for when you need the “big guns”?
- Here's how to make cottage cheese from one of my farmer friends.
- Why raw milk is the best milk for us: Raw Milk Benefits and Information: Q & A with Mark McAfee
- By the way, the picture above is when I made a different kind of cheese, but I wanted you see how I tie it up.

Pamela says
Kelly,
Just came across your site – SO much valuable info and resources – THANK YOU!
I have a question for you/your readers – I am inclined to try to use the yogurt cheese to bake a cheesecake. A) Do you think that baking the raw yogurt cheese would negate the value of using it in the recipe, so that I might as well use pasteurized cheese? B) Do you think it would hold up well?
I’d appreciate your thoughts, as I am new to experimenting with foods and you are much more experienced than I.
Rose says
Here is great tip for draining the whey. Place the yogurt in a deep, somewhat narrow bowl that you have covered with a stocking (knee – hi) – let the bulk of the stocking foot hang down into the base of the bowl to accomodate the yogurt so you dont have a mess- once you do this you will get what I mean. The following morning drain the whey off and place it in a seperate container for smoothies, soups, home made breads etc. Now you have a stocking filled with yogurt that you can hang up on a hook with a bowl underneith for drainage. Yep, it looks like the grandma characature in playboy with a mastectomy – sorry old nurse humor!. Leave several hours to drain then place the whole stocking containing the partially drained yogurt cheese into a plastic sieve placed over the bowl to drain and cover with a plate that fits the inside diameter of the sieve. Then place a clean heavy weight – like a clean rock covered with muslin cloth tied with a rubber band – on the plate and put the whole apparatus in the fridge and in a few hours you have your fabulous yogurt cheese. Remove the weight and the plate and invert the stocking containing the yogurt cheese into a permanent container wide enough to scoop out the cheese whenever you want to use it ( I use a wide mouthed mason jar) I keep all the whey as I mentioned before to use for it’s nutritional benefits.You do not even have to cut the knee – hi and can reuse it over and over again! – if the idea of a stocking creeps you out – use a white knee – hi – it looks more like cheese cloth then. Hope this all makes sense – sounds complicated but it really is very simple and effective – no scraping, no mess – good to go for a second, third, forth, time even – easy clean up
KitchenKop says
Mine is cloudy sometimes. 🙂
Meagan says
I wash my cheese cloth all the time! I just made a batch of raw milk yogurt, but I must have put too much culture in (yogurt from previous batch) or incubated it for too long (in my EuroCuisine yogurt maker) and so the yogurt part was separated out from the whey part. Too much whey and not enough yogurt! So the yogurt is straining in my kitchen. Is the whey supposed to be perfectly clear, or is it always a little cloudy?
San Diego SEO says
I’ve never been a yogurt fan myself, but my personal trainer swears by it. I’ll try the Italian Cheese to see if I can stomach it! 🙂
Kelly says
Whitney, I got my cheese cloths in a pack of 5 for something cheap, like $5 or so. But yes, I wash them in between or they’d be very stinky.
Searcher, I wouldn’t recommend soy yogurt. Soy isn’t the health food it was made out to be – you can read more here: https://www.cheeseslave.com/tag/dangers-of-soy/
If you’re allergic to dairy, have you tried raw dairy? Many do fine on raw who are unable to have pasteurized dairy in their diets. Just a thought… Also, there are other fermented foods that can give you more probiotics that aren’t made with dairy, like fermented beverages (fermented lemonade, kombucha – https://kellythekitchenkop.com/2008/11/index-of-healthy-drinksbeverages.html), or fermented veggies.
For vitamin D do you take cod liver oil? All sorts of info here: https://kellythekitchenkop.com/2009/01/cod-liver-oil-complete-index.html
Hope all that helps! Thanks for reading!
Kelly
searcher says
I have been taking probiotics but I enjoy eating yogurt much more. I’ve been avoiding dairy because of allergies but I’m planning on getting some soy yogurt soon to keep my probiotic intake high. I’ve also read that vitamin D is important to healthy probiotic levels.
Whitney says
do you rinse and re-use your cheesecloth? I always cut the smallest piece possible so I can get a lot of uses out of the package, but maybe it can be washed? Your bag just looks so big and lovely (and much easier to work with compared to my “just fits the yogurt” size! 🙂 ).
I often hang it from my upper cabinet knobs with twine 🙂 DH is, I guess, used to my craziness b/c he never says anything…lol
thanks!
Kelly says
Heather, yes, my friend Jeanne makes it with whole milk organic yogurt from the store and has good results. 🙂
Flo, so you’re a wise guy, eh? Giving me crap about my little disease maker in my kitchen…you’ll see, someday I’ll get rid of that thing! 🙂
Jen,
People forget for Real Food Wednesdays sometimes, too, and now I’ve gone and done it, I’m sorry, I added it now!
Jen@Balancing Beauty and Bedlam says
I am so enjoying my browse. I loved reading this post. I grew up with my mom making yogurt all the time but never yogurt cheese. Thanks for sharing with Tasty Tuesday. I’d love for you to join us again next week and make sure you leave a link back so everyone will know where to find us. 🙂 have a wonderful Wednesday.
Jen@Balancing Beauty and Bedlam
Mary P. says
Hi Alyss,
Regarding kefir cheese – kefir naturally has some yeast components that may be intensified when making the cheese. I think it may be an acquired taste? I like it best when I use a kefir that is not too soured. I have also heard that you can add a little milk or cream to the kefir before it drains, but I’ve never tried this. I never noticed too much fizziness in the cheese myself, but I love that quality in the kefir as a beverage. Try checking out Dom’s kefir site to see if he can provide an answer for you about this:
https://users.chariot.net.au/~dna/kefirpage.html
Alyss says
I bought a tub of Norris dairy gently pasturized whole milk yogurt the other day and just drained it to make yogurt cheese! I’ve been mixing it with homemade pesto for some fantastic sauces. Yum!
Rebecca – I would expect that the cream would not make it through the cheesecloth. You say it did though? Interesting. I would have though that the cream would have stayed in the yogurt cheese. Either way, delicious!
Mary P. – every time I try to drain kefir it gets so yeasty and almost fizzy that I don’t want to eat it. Any tips or tricks?
Alyss
Terry (One Mom) says
I’ve made yogurt from our own farm milk but not yogurt cheese. Too bad I’m not on the farm anymore but this sounds still sounds like something I should explore. And I love your yogurt cheese as kitchen decor!
Terry (One Mom)
Life with Kaishon says
Well, the probiotic part of the fudgsicle name does sound a little disturbing : ), but I totally believe they are good for you! I love the picture of the cheese bag hanging off the chandelier! So fun! So clever!
Life with Kaishon
Flo says
You know, Kelly — I mentioned the little “oven” above your stove. I was SURE it couldn’t be a microwave (even though I thought it looked a lot like one!) because I’d read what you thought of them AND you had all these other really cool gadgets. I just had to razz you a little! 🙂
I’m still looking through the Nourishing Traditions cookbook and am liking what I see. If I decide to buy, I’ll go through you for sure! Thanks!
Melissa says
Love the picture! Looks like something I would do.
Heather says
I can’t buy raw milk (yet!), so will organic milk from the store work? It is lightly pasteurized & not homogenized. (Oh, and by the way- we have the same lighting over our table.)
Heather
Rebecca from Michigan says
Happy Mother’s Day! The whey did have a cream on top after it sat. Before I used the whey last night, I skimmed the cream off the top and put that into a smaller glass container. I will use that for a recipe that needs cream this week. I didn’t even know I was killing two birds with one stone this week. Thanks for the help.
Kelly says
“So cute and clean” – HA, you guys are a riot, if only you knew! First I had to clear a TON of junk off the bar for this picture, and also, you’re just not close enough to see all the broken pieces of laminate and other junky stuff that has all gone to heck! Someday we’re going to put a new counter top on, and best of all: get rid of our microwave, which I never use anyway. When we do it, I’ll take before and after pics.
OH, and Flo, our window faces South. What a cute question. Also, if you buy Nourishing Traditions through my site it’s only $17. 🙂
Rebecca, I always use whole milk (raw though), but only use one cheesecloth and the whey is fine (not too thick). That cream on the top of the Stonyfield yogurt can either be eaten separate OR just mix it in before you put it into your cheesecloth. Hope I’m understanding and answering your questions right – if not, just comment again or email.
I love all the new ideas you guys shared. 🙂 It really is some versatile stuff, huh?
Kelly
Flo says
Kelly,
My husband would really think I’d flipped my lid if he came home to this scene — I can just see it now!!! Thank you for sharing more ideas. It sounds wonderful!
I just took ‘Nourishing Traditions’ out of the library to check it out before investing ~$25 in it. I haven’t had time to look very closely at it yet but so far it’s looking good!
You know I’m just noticing that we have the same kitchen/breakfast area! Except for the little oven above the stove and that we have cupboards partway over the peninsula, they’re the same — even down to the appliance garage/breadbox in the corner! Yours is more up-to-date, though. Ours window faces west — how ’bout yours?
Beth says
“Your kitchen looks so cute and so clean.”
Ha, that was my reaction too! Wow, I’m soooo impressed with your kitchen, Kelly!
When I make this it just doesn’t last long enough to be used for much. I ike it plain with a little salt as a spread (or just with a spoon!).
Beth
CHEESESLAVE says
LOVE the photo! That’s awesome!
Your kitchen looks so cute and so clean.
CHEESESLAVE
Julie says
Perfect timing! I was just blogging today about Piima Yogurt which can also be strained to make yogurt cheese. Yogurt cheese is fantastic (particularly when adding a few herbs) and the whey you get from straining the yogurt is so valuable for soaking grains.
Julie
Kyle says
I love how you hung it up!
I just made some yogurt, I’m going to have to try it your way!
Kyle
Mary P. says
I like your photo Kelly :))
I love yogurt cheese! I like to make it with kefir. My favorite way is to mix it with chopped fresh fruit, and then add a little honey or maple syrup (I occasionally also mix in flax oil) which I have for breakfast. I like it mixed with jam or preserves and use it as a spread too. I basically use it where one would use cream cheese, creme fraiche or ricotta – even though it’s technically not the same thing as either creme fraiche or ricotta 🙂 And I use it often instead of sour cream on baked potatoes, in dips or in dressings like you and others have said here. I also like a salad of chopped cucumbers and minced garlic (seasoned with salt to taste) mixed together with creamy yogurt cheese and a good glug of olive oil. Oh, and I like to spread the cheese out on a dish, drizzle with olive oil, and sprinkle with herbs and seasonings and/or minced garlic, chilies, green or red peppers, etc. Serve with flat bread and sliced veggies, scallions and olives. You smear the cheese on the bread and put some veggies on it and wrap it up. Really good!
FoodRenegade says
We’re not very original with our yogurt cheese. During the holidays, we mix in pumpkin, spices, and sucanat to make a pumpkin pie flavored dessert-like fruit dip. The rest of the year, we mix in dill, salt, and pepper and use it as a savory dip.
I like Motherhen68’s idea. THAT sounds right up my alley.
Thanks for sharing this in today’s Fight Back Fridays carnival.
Cheers,
KristenM
(AKA FoodRenegade)
FoodRenegade
Rosy says
Ha ha how funny, I was just draining my first homemade yogurt cheese experiment yesterday, and have a nice little dollop to play with today. I was going to sub it for mayo in an avocado based ranch dressing recipe I found on all recipes. I will let you know my final outcome and post the recipe if it is yummy enough to make again.
Soli says
I LOVE how you set up the cheese to prep, that’s awesome. And now that my semester is over I can hopefully spend some time this summer actually reading NT and starting to do some of the food prep. Today I am ordering my first sourdough starter. (New England style, since that IS where I live.)
Soli
Rebecca from Michigan says
I just love this! I went out last night and purchased a 32 oz Stoneyfield whole milk yogurt to make yogurt cheese and whey . I even had a question for you and was going to email you, but you save me from having to look up your email. Great minds think alike.
My question, because it is whole milk will my whey be thicker or do I need to double up on my cheese cloth? Okay, I have another question, on the container it states “with cream on top” does that mean I will have to take the cream off the top and use that for something else? I am looking at the jar right now and it does have a separation that looks like cream on top and whey on bottom.
FYI, I just received my first Wise Traditionas Journal was very shock on how thick it was. I was expecting something much thinner.
Katie says
I make tzatziki sauce to serve with lamb and pita. I don’t let it get quite as thick as cream cheese when I use it for tzatziki sauce, but thick enough. I love to use the leftover whey in smoothies, soups and bread too.
Motherhen68 says
You know what is delicious? I take the yogurt cheese and mix in a tablespoon or so of lacto-fermented salsa. This turns into a spicy ranch dressing (if it’s still thick, thin with cream or milk). It is so good over fried eggs or an omelet, tacos, a spicy grilled chicken, etc. I rarely eat yogurt plain anymore, but use this cheese in all sorts of other dishes. It’s gotten to the point where I could make 2 gallons of yogurt each week and still need more! I’m addicted to this stuff. 🙂
Motherhen68